Game Development Reference
In-Depth Information
Adding tags to an object puts a label on it that you can refer to in your scripts. In this case, you
have tagged the First Person Controller as Player, so the portion of the
ZombieStationary.js
script that tells the zombie to target objects tagged as Player will tell the zombie to chase the
First Person Controller.
3. Save your Unity scene and project.
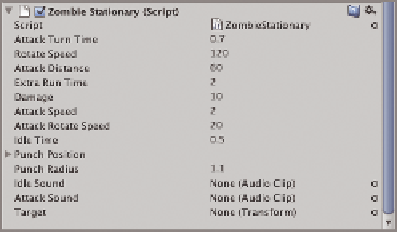
If you look at the script's panel in the Inspector view, you
will see that you can fine-tune the zombie's movement variables
in that panel. If you play the game now, the zombie will chase
the player around and animate, due to commands in the code
like this:
animation.CrossFade(“Chase”);
In the next section, you will help the player defend him- or
herself from the zombie by giving the player a gun and making
the zombie killable.
Figure 10.10
Settings for the
ZombieStationary.js
script
Making the Zombie Killable
In this section, you will add the scripts that utilize the colliders you added in the previ-
ous section and kill the zombie with a headshot. You will also place a gun script onto
a child object of the First Person Shooter's camera to give players something to defend
themselves with.
1. If it is not already open, open your Unity file and select the zombie object.
2. Create a new JavaScript file in the
Scripts
folder and name it
ZombieDamageReceiver.js
.
Open the script and add the following code:
var hitPoints = 100.0;
var damage = 5.0;
var detonationDelay = 0.0;
var explosion : Transform;
var deadReplacement : Rigidbody;
var deathsound : AudioClip;
function ApplyDamage (damage : float) {
if (hitPoints <= 0.0)
return;
hitPoints -= damage;
if (hitPoints <= 0.0) {
var emitter : ParticleEmitter = GetComponentInChildren(ParticleEmitter);
if (emitter)
emitter.emit = true;
Invoke(“DelayedDetonate”, detonationDelay);
}

Search WWH ::

Custom Search