Game Development Reference
In-Depth Information
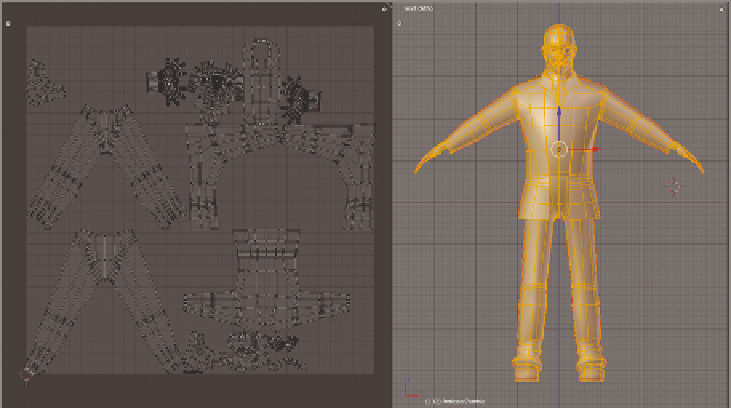
9. Now that you have your seams marked, press A until all of the geometry on the zom-
bie mesh is selected. Press U to access the Unwrap menu and select Unwrap to sepa-
rate the UV islands in the UV/Image Editor. Your result should look something like
that in Figure 4.22.
10. Save your file. Look at
C04_Zombie_Unwrapped.blend
at the topic's web page to see what
the unwrapping should look like so far.
Figure 4.22
The resulting UV
islands after marking
seams and unwrap-
ping the mesh
At some point, you'll want to unwrap the zombie's eyes as well. Apply any Mirror
modifiers you have on the eye objects and simply divide each eyeball into a front and back
half with seams. You should end up with two circular UVs for each eye.
The unwrapping looks pretty good at this point, but it's far from optimal for texture
painting. The main area of offense here is the face UV, which will be the focus of both our
sculpting and color detail. When painting textures, you want your UVs to be as large as
possible so you can create high-resolution images. To fix these problems, you'll need to
adjust the UV layout with Blender's UV/Image Editor, which will be covered in the next
section of the chapter.
Using Blender's UV/Image Editor
One of the advantages of Blender's UV/Image Editor is how the controls for the editor
mimic those of the regular Blender interface. Like the 3D View, each UV/Image Editor
window has N and T panels of its own, the UV/Image Editor Properties panel, and the
UV/Image Editor Toolshelf. Much of the content of these panels is unnecessary, but there
is one tool in the UV/Image Editor Properties panel that can be useful to texture artists:
the Stretch command. This command can be found in the Display section of the UV/
Image Editor Properties (Figure 4.23).
Search WWH ::

Custom Search