Information Technology Reference
In-Depth Information
automatically includes the option to add an ESXi host to the distributed switch during the pro-
cess of creating it.
Perform the following steps to create a new vSphere Distributed Switch:
1.
Launch the vSphere Web Client and connect to a vCenter Server instance.
2.
On the vSphere Web Client home screen, select the vCenter object from the list on the left,
then select Distributed Switches from the Inventory Lists area.
3.
On the right side of the vSphere Web Client, click the Create A New Distributed Switch
icon (it looks like a switch with a green plus mark in the corner).
This launches the New Distributed Switch wizard.
4.
Supply a name for the new distributed switch, and select a location within the vCenter
inventory (a datacenter object or a folder) where you'd like to store the new distributed
switch. Click Next.
5.
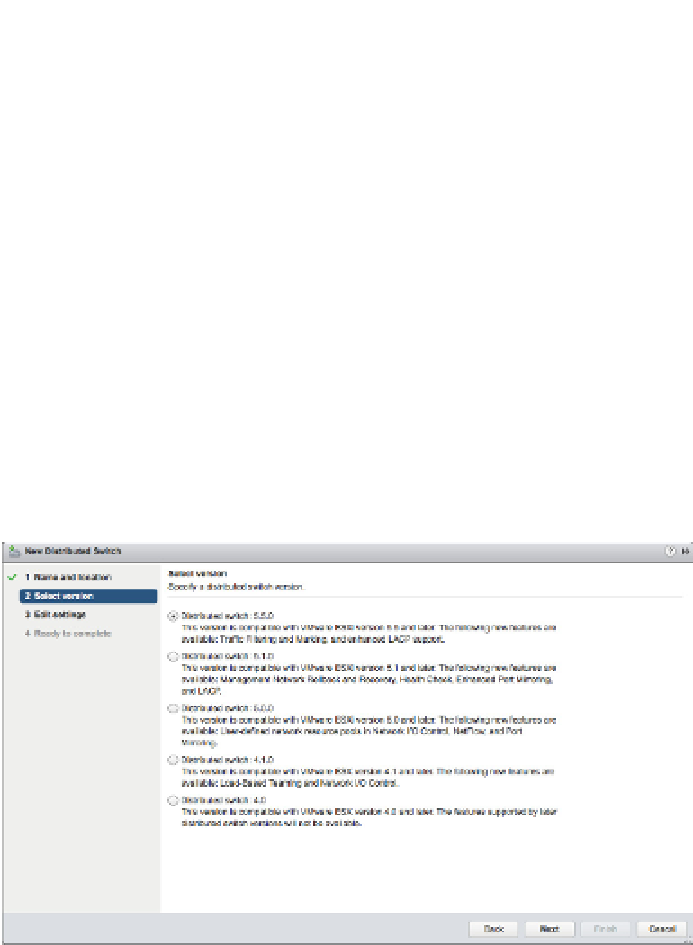
Next, select the version of the VDS you'd like to create. Figure 5.45 shows the options for
distributed switch versions.
Figure 5.45
If you want to sup-
port all the features
included in
vSphere 5.5,
you must use a
Version 5.5.0
distributed switch.
Five options are available:
Distributed Switch: 4.0: This type of distributed switch is compatible back to
vSphere 4.0 and limits the distributed switch to features supported only by vSphere 4.0.
◆
Distributed Switch: 4.1.0: This version adds support for Load-Based Teaming and
Network I/O Control. This version is supported by vSphere 4.1 and later.
◆
Distributed Switch: 5.0.0: This version is compatible only with vSphere 5.0 and
later and adds support for features such as user-dei ned network resource pools in
Network I/O Control, NetFlow, and port mirroring.
◆
◆
Distributed Switch: 5.1.0: Compatible with vSphere 5.1 or later, this version of the
distributed switch adds support for Network Rollback and Recovery, Health Check,
Enhanced Port Mirroring, and LACP.