Graphics Reference
In-Depth Information
Figure 14-3. Choose a Connect server.
4.
Select the server you want to use by clicking on the server name
or URL. If the server isn't listed, you can click the
Add
button to
enter information about a new server. You must enter both the
name and URL of the server. Click
OK
when you are done to close
the Adobe Connect Server window.
5.
Select the check boxes for the output options you want.
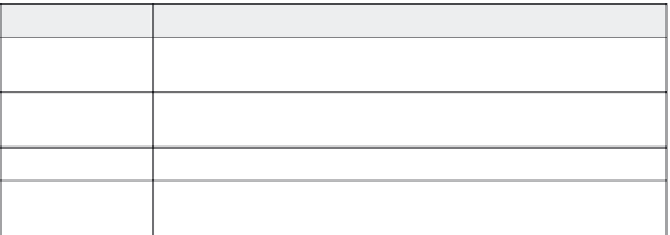
Table 14-2. Adobe Connect output options
Select this option:
To do this:
Enable Adobe Con-
nect Server tracking
Allow the Adobe Connect server to track viewer interactions within the Capti-
vate movie.
Publish project files
(*.cp)
Copies the source Captivate file (along with the output SWF file) to the Con-
nect server.
Zip Project file
Zips the Captivate source file before storing it on the Connect server.
Publish Video Files
(*.flv)
Copies FLV files (if any) from the Captivate project to the Connect server.
6.
The Project Information area on the right of the screen displays
the current preference settings for the movie, such as the resolu-
tion (in pixels) and audio information. To change the options listed
in this area, click
Preferences
to display the Preferences window.
The output options on this window are described later in this chap-
ter in Table 14-4; other preferences are described in Chapter 13.