Graphics Reference
In-Depth Information
render layer. However, if the characters in a
shot will fall under different lighting condi-
tions, we should break them out in separate
Render Layers so that their color and over-
all look can be adjusted individually.
What adds a bit of complexity to the shot
is the fact the both the Beast and mother
are in direct contact with the fl oor within
the rendered frame and cast shadows. If the
shadows only fell on the fl oor, we could
add a simple plane object to the characters'
layers with a “Shadow Only” material (the
OnlySha
button on the material
Shaders
panel) and composite the faked shadow in
with the rest of the piece. However, the
Beast's shadow interacts with the couch, so
we have to use the real scene geometry.
That doesn't mean that we have to render the background at full quality for every frame, though. We still
generate a high quality background render without the characters, using the setup described for the previous
shot. The exception is that we exclude the key lamps, rendering only the ambient shadowbuffered lights that
accompany the set. Figures 15.28 and 15.29 show the set without any additional elements and the render to
be used as a background.
With the background created on the highest render settings (16
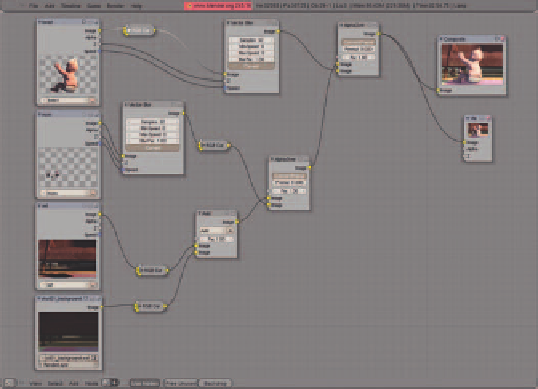
Figure 15.27
The simplifi ed node network for the composite (extraneous
nodes have been removed)
OSA, all lamps available), we are free to
render the actual frames with only the keylighting, which will be much faster. We will be rendering the set
with only two spot lamps, as opposed to hundreds for each frame.
Figure 15.29
The background render. As you can see, the
image is very dark
Figure 15.28
The set from the camera's perspective. Note that only the
raw set lighting is used. Grouped key lamps would be green in the display


Search WWH ::

Custom Search