Graphics Reference
In-Depth Information
so that, perhaps, the leg has moved more than
the arm. Next, you build a pose showing the
actual start of the throw, proceeding through the
entire action creating fully formed poses.
Straight Ahead animation tends to produce a
looser feel because the actions and poses are not
necessarily planned in advance. You will cer-
tainly have an end goal in mind for your charac-
ter, but how the action of the character develops
toward that goal depends on the spontaneity of
the animation. In
The Beast
, the dog's leaping
escape across the countertops with the Beast's
stuffed animal was animated in a straight ahead
fashion (Figure 11.15).
Figure 11.15
The mean dog runs away with the Beast's toy
Straight ahead animation is great for fast action that needs to feel dynamic.
Pose to Pose Animation
For shots with lots of acting where a character has a carefully planned series of actions from the storyboards,
the pose to pose method is more appropriate. Using this approach, the major poses are created fi rst along the
timeline. After they work well and the entire shot is blocked in, adjustments are made to timing, while antici-
pation, follow through, and secondary actions are added.
The great advantage of pose to pose animation is that it is very controlled. Your actors do what you want
them to do, exactly when you want them to do it. This means that complex interactions between different
characters are manageable, and you will not have trouble sticking to your story reel frame count and timeline.
With straight ahead animation, it is easy to animate too much (or too little) to fi t your initial timing estimates.
Another point in favor of the pose to pose method, especially when working with or for someone else, is that
the key poses can be created, approved, and discussed before you take the time to really refi ne things. If it's
not what your collaborator or supervisor is looking for, you can rework the poses or overall timing without
having to throw away too much work. We'll talk about refi ning your animation in the next section, but let's
take a quick look at how to block in pose to pose work.
When your initial pose is created, use the
A
key to select all of
the channels in the Action Editor. To do this, hover the cursor
over the channel names on the left side of the window when
you press the
A
key. Otherwise, you will select the keyframes,
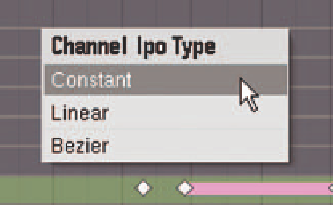
which you don't want to do. With all of the channels selected,
press
Shift-T
and select
Constant
from the menu that pops up.
Figure 11.16 shows the pop-up, with all Action channels selected.
Figure 11.16
Setting Interpolation to Constant

Search WWH ::

Custom Search