Graphics Programs Reference
In-Depth Information
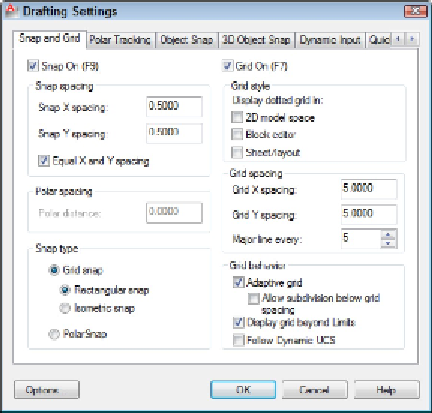
Figure 3-3:
Snap and Grid settings.
9. Change the values in the dialog box so it looks like Figure 3-3:
•
Snap On:
Selected
Snap
constrains your crosshairs to moving in an invisible grid of equally
spaced points (0.5 [10] units apart in this case).
•
Grid On:
Selected
Grid
displays a visible grid of little dots or grid lines on the screen (5 [100]
units apart in this case), which you can use as reference points. The grid
doesn't appear on printed drawings.
•
Snap X Spacing:
0.5 [10]
•
Snap Y Spacing:
0.5 [10]
•
Grid X Spacing:
5 [100]
•
Grid Y Spacing:
5 [100]
10. Click OK.
You see a network of grid lines, 5 [100] units apart, in the drawing area. If you move
your mouse pointer around and watch the coordinate display area at the left side of
the status bar, you notice that the values change in 0.5-unit [10-unit] increments.
11. Click the tiny down arrow below the Zoom button (the one with the magnifying
glass) on the Navigation bar (at the right edge of the drawing area in Figure 3-1),
then choose Zoom All from the menu.
AutoCAD zooms out so that the entire area defined by the limits is visible.

