Graphics Programs Reference
In-Depth Information
gone to the trouble of setting up a shaded 3D viewport, why not make it a little
more realistic and turn on perspective mode at the same time?
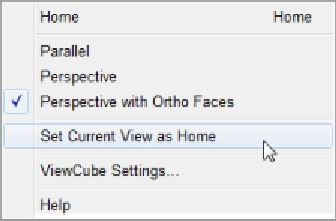
10. In the large 3D viewport, right-click the ViewCube to display its shortcut menu,
then click Perspective With Ortho Faces (see Figure 22-4).
Selecting Perspective shows your orthographic views in perspective mode, and
usually you don't want that. Selecting Perspective With Ortho Faces resets the pro-
jection mode from perspective to parallel when you switch to an orthographic view.
Figure 22-4:
Changing settings in the ViewCube's right-click menu.
11. Repeat Step 10, this time selecting Set Current View As Home.
Now you can readily return to this viewport configuration, keeping the same view-
point in all viewports, perspective projection in the 3D viewport, and parallel pro-
jection in the orthographic viewports.
To return to a single viewport later, simply click the plus (+) sign on the in-canvas
viewport control.
The last thing to do is save the configuration you've just set up as a template
(
.dwt
) file.
12. Click Save on the Quick Access Toolbar. On the Files Of Type drop-down menu,
choose AutoCAD Drawing Template (*.dwt) and enter a filename. Click Save.
AutoCAD saves your new 3D template file in the same place as your other templates
so it's always there for you to select when you want to do some serious 3D model-
ing.
Seeing the world from new viewpoints
When you choose 3D in the Viewports dialog box's Setup drop-down list, you direct
AutoCAD to change the viewpoint in each viewport. The default viewpoints when you
choose a four viewport arrangement are top, front, right, and SE (“southeast”) isometric.
These viewpoints work well for viewing and constructing simple models, but eventually,
you'll probably want to specify your own custom viewpoint in a particular viewport.