Graphics Reference
In-Depth Information
7.
Click OK. Your new preset is now available in the Apply Custom Name pop-up menu.
8.
Before you apply this custom name preset to any clips, make sure that you've entered the relevant scene
numbers for each clip in the Scene field of the Inspector (available by selecting the General View). If you
apply this custom name preset to a clip whose Scene field is blank, the clip's new name will not include any
scene information.
9.
Select the clips that you want to apply the custom name preset to in the Event Browser, choose Apply
Custom Name from the gear button beneath the Inspector, and select your new preset from the pop-up menu
(in this case, Scene/Cutaways with Counter).
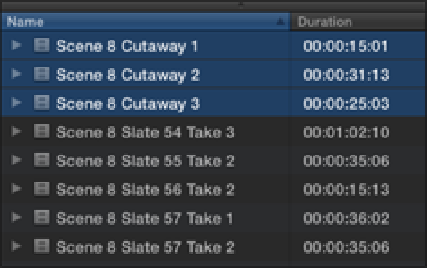
10.
The selected clips have now been renamed using the naming format set out in your preset (see Figure
4.27).
Figure 4.27
Renamed clips using a custom name preset.
The Naming Presets window provides a useful selection of naming tokens that can be used to rename your me-
dia in a variety of different ways. How you apply these tokens will depend on the naming format that you want
to use and the metadata that is available for the clips that you want to rename.
Assigning Roles
Final Cut Pro automatically assigns a Role to the media that you import and labels it as Video, Titles, Dialogue,
Music, or Effects. Roles can be used to group files in the Event Browser according to these categories or as a
way to single out a particular type of media in a complex Timeline. Media assigned with Roles also can be ex-
ported as media stems, allowing you to export a Project's dialogue or sound effects as separate audio files. A
clip's Role can be viewed or reassigned in the Event Browser, the Inspector, or the Timeline Index.
To reassign a Role to a clip, select the clip and choose Modify
⇒
Assign Role and choose an item from the menu;
in the List View of the Event Browser, click a clip's Role under the Role column and choose an item from the
shortcut menu; in the Info pane of the Inspector, select an item from the Roles pop-up menu; or, in the Clips
pane of the Timeline Index, click a clip's Role under the Role column and choose an item from the shortcut
menu.
You aren't limited to the five default Roles that are available in Final Cut Pro—you can easily create your own
Roles or Subroles in the Role Editor (see Figure 4.28). A Subrole is a smaller subset of a Role that can relate to
anything that you want to label in your Project. Subrole categories such as Cutaway, B-roll, Interview, or Visual
Effects could be created as part of the much larger Video Role, for instance.