Graphics Reference
In-Depth Information
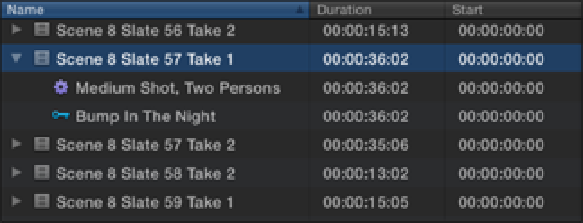
A clip's association with a Collection can be identified in the Event Browser by the color of the horizontal lines
displayed over the clip's thumbnail. A clip displays a purple line if it's associated with a Smart Collection and a
light blue line if it's associated with a Keyword Collection. It also can be identified by the icons beneath the
clip. A key icon links a clip to a Keyword Collection, and a gear icon links it to a Smart Collection. A clip can
belong to both a Keyword Collection and a Smart Collection at the same time (see Figure 4.17). The selected
clip in this example is associated with both the Bump in the Night Collection and the Medium Shot and Two
Persons Smart Collections.
Figure 4.17
A clip belonging to both a Keyword Collection and a Smart Collection.
Assigning keywords
When you imported the
Bump in the Night
folder earlier, Final Cut Pro tagged all the items inside with a
keyword based on the name of the folder. In this case the folder's contents were tagged with the Bump in the
Night keyword. Final Cut Pro created a collection derived from this keyword and placed it inside the Event
Library. This is because you had Import folders as Keyword Collections checked in the Import Preferences set-
tings. If you wanted to bring in further files tagged with this keyword, you would first select the collection in-
side the Event Library and import the files directly into it by using one of the import methods discussed in
Chapter 3.
As handy as these automatically generated collections are, the true power of this system comes from using your
own keywords. You can create your own keywords using the Keyword Editor and assign these to clips inside
the Event Browser. Final Cut Pro will then generate a collection inside the Event Library that's derived from the
keywords that you create. To show or hide the Keyword Editor, press the key button on the Toolbar, choose
Mark
⇒
Show/Hide Keyword Editor, or press +K.
You can assign a keyword to an entire clip or to just the selected sections within a clip.
•
To assign a keyword to a clip,
select it in the Event Browser, type a keyword in the Keyword Editor, and
press Return.
•
To assign a keyword to a selection within a clip,
drag a selection over the area you want to tag, type a
keyword in the Keyword Editor, and press Return.
•
To assign a keyword to multiple items at the same time,
Command-click on the clips that you want to
tag inside the Event Browser, type a keyword in the Keyword Editor, and press Return.
A clip can have more than one keyword assigned to it. If a clip has been tagged with the keyword Night and
also with the keyword Exterior, it appears in both of the Night and Exterior Collections. The Keyword Editor
displays all the keywords associated with a clip in its name field. The clip shown in Figure 4.18 has two
keywords linked to it: Bump in the Night and Katie.