Graphics Reference
In-Depth Information
making the house a little creepier. This should help establish the genre of the movie and introduce a sense of
dread and foreboding to the start of the movie.
1.
Double-click the
Craft of the Cut
disc image to mount it. In the Project Library, double-click the Pranks
Work in Progress Project to open it in the Timeline. Select Scene 2 Slate 7 Take 1 (the third clip in the
Timeline), and press +4 to open the Inspector. Before working with the shape mask, let's first make some
adjustments to improve the overall image. Open the Inspector's Video panel and under Color, click the Col-
or Board button next to Correction 1 to open the Color Board.
2.
Click the Exposure pane. First, we'll lower the exposure of the brighter areas of the image. Select the
Highlights puck and using the down arrow, lower the highlights to -12. We'll do the same for the shadows,
select the Shadow puck and lower it to -8. Finally, select the Midtones puck and raise it to 7. Next, we'll
add a very subtle blue tint to the image's midtones. Click the Color pane and select the Midtones puck.
Raise the midtones to just 2, and move the puck to the right into the blue area of the Color Board—a value
of about 227 should be just fine. Click the Back button at the top of the Color Board to take you back to the
Inspector.
3.
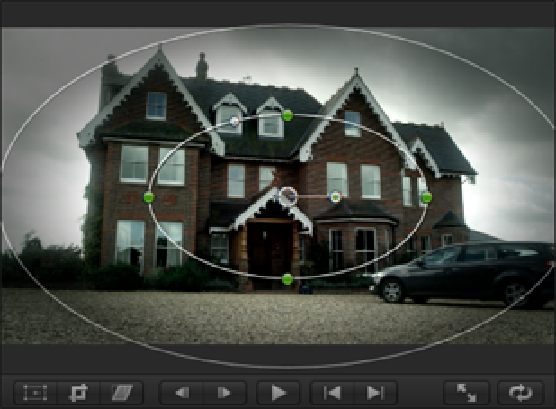
Under Color, click the + button to add a second Correction. Click the Add Shape Mask button for Correc-
tion 2 to add a shape mask to the image. The two circular, on-screen controls appear over the image in the
Viewer. Use the top and right green handles to increase the width and height of the shape so that it looks
like the oval in Figure 15.11; then click and drag out the outer circle to soften the shape's edges. Click the
Color Board button next to Correction 2 to open the Color Board and go to the Exposure pane.
4.
Let's darken the area around the house to give it an aura of gloom by adjusting the exposure outside the
shape mask. Click the Outside Mask button and drag the Highlight Puck downward to lower the highlights
to -43. Lower the midtones to -22 by dragging down the Midtones puck in the same way.
5.
Our house is already looking quite spooky, but we can accentuate the effect by punching up the exposure
inside the shape mask. Click the Inside Mask button and select the Highlights puck. Drag the puck up to in-
crease the highlights to 45. To complete the effect, lower the exposure of the shadows inside the shape mask
to -5. The darkened edges around the house along with increased highlights inside the shape mask help to
draw the viewer's eye to the center of the frame.
Figure 15.11
Applying a shape mask.