Graphics Reference
In-Depth Information
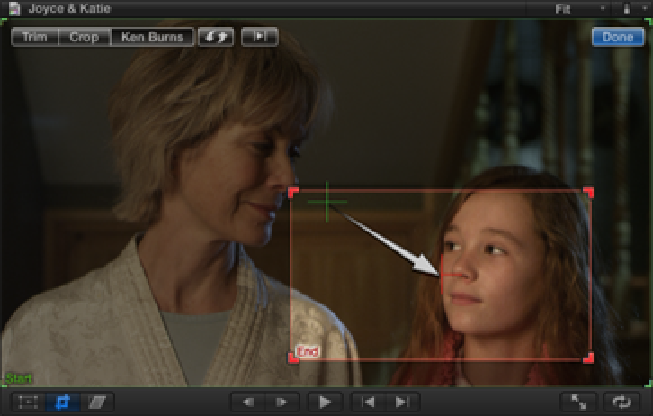
To bring up the Ken Burns on-screen controls select a clip or still image in the Timeline, click the second button
below the Viewer (or press Shift+C), and click the Viewer's Ken Burns button. Two color rectangles appear
over the image in the Viewer. The green rectangle represents the starting position and the red rectangle repres-
ents the ending position. By dragging the corner handles, you can position each rectangle to indicate the start
and end framing of the move. An on-screen arrow shows the direction of the pan and zoom across the image
and can be reversed by clicking the double-arrow button at the top of the Viewer. Figure 14.4 shows a still im-
age of both Joyce and Katie (we've included the still on the DVD for you to experiment with; it can be found in
the Images Collection). The green starting rectangle is set up to include both characters in the frame and the red
ending rectangle is set up to include only Katie, resulting in a zoom-in and pan to the left that ends on a close-
up of Katie.
Figure 14.4
The direction of the Ken Burns effect in the Viewer.
The speed of the Ken Burns effect is dependent on the duration of the clip or still image in the Timeline. For a
faster move, simply shorten the clip in the Timeline. To preview the effect, click the Play button at the top of the
Viewer. As before, clicking Done applies the effect. When using the Ken Burns effect, aim to use images that
are larger than your video project's frame size. This gives you a larger area in which to pan and zoom across
and avoids unnecessary scaling, thus improving image quality.
Distorting images
The Distort effect allows you to reposition all four corners of an image to warp and skew the shape of the
frame. This can be used to place an image inside another object in the frame, such as a television set, or to simu-
late depth or create the illusion of perspective in a composition.
To bring up the on-screen Distort controls, select a clip in the Timeline and click the third button below the
Viewer or press Shift+ +D. This places eight blue rectangle handles around the image in the Viewer. Dragging
any of the corners allows you to skew the image in the shape that you require. The
x
- and
y
-coordinates for each
of the four corners also can be altered numerically inside the Distort section of the Inspector's Video pane.
Animating with keyframes
The changes that you make to the Transform, Crop, and Distort parameters can be animated over time using
keyframes. A keyframe specifies an effect's parameter value at the position of the playhead in a similar way to