Graphics Reference
In-Depth Information
1.
Select the Bump in the Night Collection in the Event Library and change the Event Browser's filter to Fa-
vorites so that only the rated sections appear in the Event Browser.
2.
Open the Bump in the Night Project in the Timeline by double-clicking it in the Project Library.
3.
Position the playhead at 1 minute and 26 seconds on the Storyline.
4.
Select Scene 8 Slate 58 Take 2 in the Event Browser.
5.
Choose Edit
⇒
Insert from the menu bar or press W.
6.
The clip is inserted into the Primary Storyline. Play back the edit to see the results.
Now you'll add another clip by manually dragging it between two other clips in the Primary Storyline:
1.
Position the playhead at 1 minute, 41 seconds, and 1 frame on the Primary Storyline.
2.
Select Scene 8 Slate 59 Take 1 in the Event Browser and drag it to the playhead position between Scene 8
Slate 57 Take 2 and Scene 9 Slate 60 Take 3.
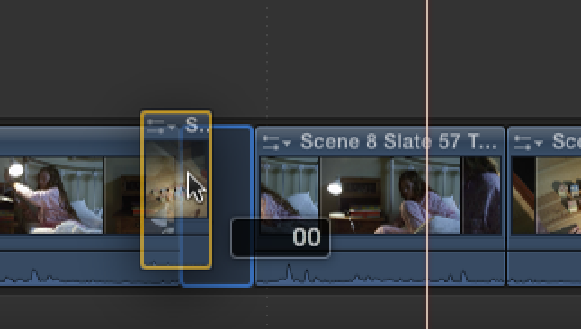
3.
As you drag the clip between the two clips, a blue bar appears at the edit point and the clips to the right
side slide out of the way to accommodate the new clip (see Figure 5.9).
4.
Play back the edit to see the results.
Figure 5.9
Dragging a clip into the Primary Storyline.
Working in the Magnetic Timeline
Now that you've added some clips to your Project, let's look at some ways to work inside the Timeline window.
When a Project is opened in the Timeline, the Project's name is displayed at the top of the window to the right
of two navigation arrows. These forward and back arrows work in the same way as a web browser's page his-
tory buttons and allow you to move through previously opened Projects or Compound clips. Clicking and hold-
ing down an arrow reveals a history menu, and selecting a Project from the list opens it in the Timeline window
(see Figure 5.10).