Hardware Reference
In-Depth Information
Hardware configuration
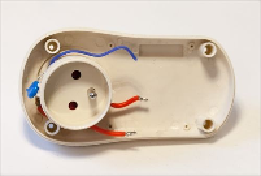
The first step is to actually open the device you want to hack. The device I used included a
lot of electronics inside that I simply removed (we won't need these components anymore),
leaving just the important parts: the power plug on both sides of the device and two cables
going to both parts of the plug:
These two cables will have to be connected together if we want to get some current to flow
into the device that is plugged into the hacked device. To do so and control the plug from
the Arduino board, you need to insert the relay module now.
Note
Basically, a relay has three output pins: a common pin named
COM
, a pin that's
normally
closed
(
NC
), and another pin that's
normally open
(
NO
). Normally closed means that this
pin is connected to the COM pin of the relay when no voltage is applied to the input of the
relay. On the other hand, normally open means that this pin is disconnected when no input
is applied to the relay.
You need to connect one of the red cables going to the plug to the COM pin of the relay,
and the other one to the NO pin of the relay so that the circuit closes when we signal the re-
lay. The following image shows the device at this step: