Graphics Programs Reference
In-Depth Information
Sculpting Concepts
With Blender set up nicely for sculpting, let's get to
it. In general, we'll sculpt from coarse to fine, just
like sculpture in the real world. By beginning with
the broad structure of the final product we want
to achieve and working toward the fine details, we
reduce the number of steps we need to undo in
order to correct errors.
This section will introduce you to some general
concepts in the order I think about them when
sculpting.
Volumes and proportion
When beginning to
sculpt, first set out the rough shape of your sub-
ject; in other words, create a rough volume for
each component of your overall figure. When
sculpting a character, you should block out the
volumes of the legs, arms, torso, head, hands,
and feet. This is accomplished partly by creat-
ing a good base mesh. For example, we already
created the basic shape of the Bat Creature
character in Chapter 4; however, this can still
be refined and improved while sculpting to give
a better feel for the size and overall shape of the
model.
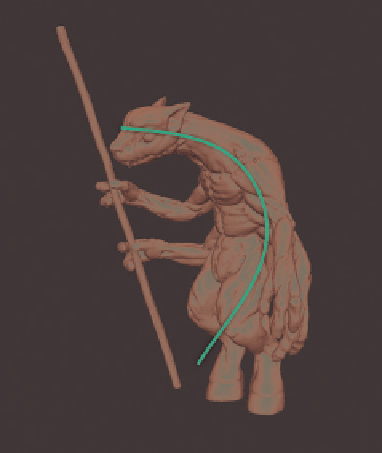
Figure 6-16: Try to establish smooth curves that
flow through your characters
these planes include those along the side of the
head, along the jawline and chin, and down the
bridge of the nose. Smaller secondary planes
form the shapes of the ears, lips, and nostrils.
(You don't actually need to define the planes
of your model too rigorously, as they will be
smoothed out later, but it is important to know
and roughly mark in where they are.)
Gesture
Gesture describes the stance of a char-
acter and the flow of forms from one body part
to another. This stage applies more to posed
characters but is an important part of creating
a good neutral pose, and even applies when
sculpting inorganic forms. Key at this stage is
that the forms of the body are connected by
smooth, flowing curves. You should usually be
able to draw a smooth curve through your char-
acter's pose, as shown in Figure 6-16.
Coarse details and anatomy
Once you've finished
creating the main volumes and planes of your
sculpture, you'll find that many of the anatomi-
cal details are actually already present, though
there are still many anatomical features to be
added to the final sculpt. Achieving anatomi-
cal realism in your sculpts takes practice and is
a matter of gathering and studying anatomical
references and then placing and refining those
anatomical landmarks on your sculpt.
One way to begin filling in the details is to
start with the major muscle groups and skeletal
landmarks and then progress to smaller details
like the musculature and small features like
fingers, ears, eyes, and so on. See “Planes” on
page 79 to learn how I accomplished this for
the Bat Creature.
Planes
By planes, I mean breaking down and
simplifying the form of the object into flat
planes—areas of the object that form broadly
flat surfaces rather than polygons. The direction
and placement of the planes in your sculpture
determine how the surfaces of your objects
catch light, creating patterns that in turn play a
large part in how we read and recognize shapes.
Even though you'll ultimately smooth out
these planes, they'll still influence your finished
object. For example, the planes in a human
or humanoid character are largely defined by
the object's major anatomical landmarks, such
as the bony parts of the skull, ribcage, collar
bones, and pelvis. In Figure 6-17, the main large
planes are defined by the shape of the skull;
Fine details and surface texture
Finally, we prog-
ress to fine details, like wrinkles and pores
in skin, or technical details in a hard-surface
model (see Figure 6-18). This is a fun stage
Search WWH ::

Custom Search