Graphics Programs Reference
In-Depth Information
arm and split them from the body (
Y
). I then
shifted the arm out and bridged the edges around
the gap using the Bridge operator (W
4
Bridge Two
Edge Loops). This connected two strings or loops of
vertices together, filling them in with faces from one
to the other. The two must have the same number of
vertices to be joined.
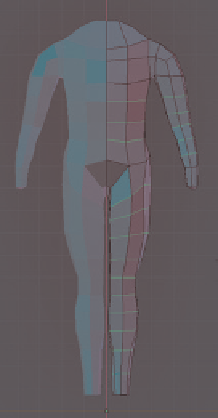
Then I added some more loop cuts over vari-
ous parts of the body, running across the forms, to
even out the mesh and give an even distribution of
roughly square quads (Figure 4-19). You can adjust
the position of an existing edge loop using the Edge
Slide operator (
ctrl
-E
4
Edge Slide), which lets you
slide edge loops up and down.
Figure 4-19: Adding some extra
edge loops around the legs,
arms, and torso
Figure 4-17: Refining the body in side view (left) before
adding an edge loop running around the middle (right)
As I went along, I tried to make sure that my
mesh was completely composed of quads, and I
aimed to keep the size and shape of the quads
approximately even and square. This is important
when creating a base mesh for sculpting because
triangles,
n
-gons, and long, thin faces generally
create artifacts when sculpted on.
To create a loop of faces running around the
shoulder (Figure 4-18), I selected the faces of the
Modeling the Hands and Feet
To model the hands (as shown in Figure 4-20), I
began with a cube and flattened it by scaling it down
along its
x-
axis to form the basis for the palm
❶
.
Then I added some loop cuts around the middle
and vertically
❷
.
At this point, I could have extruded the fingers
straight out from each face at the base of the palm.
Doing so, however, would have created some nasty
topology where the fingers meet each other that
would neither sculpt nor deform well when posed.
Instead, I did some extruding to add face loops that
run between the fingers
❸
. For the middle one, I sim-
ply selected half of the hand and extruded out. For
the outer two gaps, I extruded in the middle 4 faces
on the bottom half of the hand on both sides, as well
as those connecting the two sides along the bottom,
for a total of 10 faces.
Figure 4-18: Adding a loop of faces around the shoul-
der. This loop made it easy to reposition the arm in dif-
ferent poses without deforming the chest.


Search WWH ::

Custom Search