Graphics Programs Reference
In-Depth Information
Table 4-3:
Useful Modifiers for Modeling
Type
Modifier
Effect
Mirror
Mirrors the geometry of the mesh along the specified axis, about the object's origin, or
of another object. Mirror modifiers are very useful for creating symmetrical objects.
generate
Array
Copies the mesh geometry and offsets it using a fixed offset relative to the object's size
or some other object. Arrays are useful for models with repeating elements.
Subdivision Surface
(Subsurf)
Divides each face of a mesh into four smaller faces and smooths them, creating a
smoother mesh with each iteration. Subsurfs are useful for objects with smooth surfaces,
particularly organic models.
Solidify
Extrudes the geometry along its normals to create a solid shell from a surface.
deform
Lattice
Uses a 3D grid of points to smoothly distort the shape of a mesh.
Shrinkwrap
Projects the mesh onto the surface of another object.
Curve
Deforms a mesh along the path of a curve.
one direction. You can also scale on all
but
one axis
by pressing
shift
and
X
,
Y
, or
Z
.
Switching to Edit mode (
tab
), I added a hole by
extruding in the two outside faces and scaling them
on the
x
- and
z
-axes only. Next, I deleted the center
faces (
X
) and created new faces around the hole
in the center by selecting two open edges at a time
and making a face between them (
F
), as shown in
Figure 4-7.
Back in Object mode, I added a plane (
shift
-A
4
Mesh
4
Plane) and scaled it up to form the ground
plane of the scene. Then I added a camera and
moved it to roughly view the door I was looking for.
A quick way to do this is to navigate to the view you
want just within the 3D Viewport and then press
ctrl
‑
alt
-0 to snap the camera to the current view.
You can also just move and rotate the camera like
any other object. Note that this might result in the
camera getting slightly tilted. You can rectify this
by manually setting the Y rotation of the camera
to 0, using the Rotation properties in the Transform
panel of the Properties region (
N
).
From here, I added some simple walls to form
the main boundaries of my scene simply by adding,
scaling, moving, and extruding cubes. Next, I began
adding more cubes, keeping in mind how they would
become the final architectural elements of the scene,
like stone walls, statues, and loose blocks of stone.
This progression is shown in Figure 4-8.
With the simple elements blocked in, I began
to add rough proxies for the trees I wanted growing
over the ruins. To create these proxies, I added a
Bézier curve object and set the handles to automatic.
Then I used Blender's Snapping tools to extrude
curves resembling the roots and trunks of trees over
the surfaces of the placeholder objects (Figure 4-9).
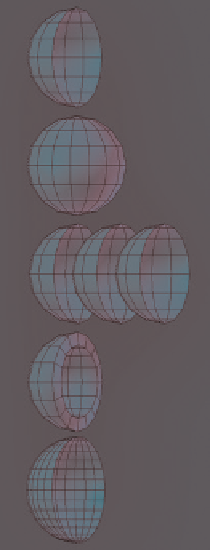
Figure 4-6: Different generate
modifiers and their effects. From
the top, we see half a sphere
❶
,
with a Mirror modifier
❷
, an
Array modifier
❸
, a Solidify
modiier
❹
, and a Subdivision
Surface modifier
❺
applied.
Modifiers can be combined to
create all sorts of shapes more
easily than modeling them
by hand.
❶
❷
❸
❹
❺
Blocking in the Jungle Temple
Let's consider the Jungle Temple scene. For this
project, my initial concern was designing a layout
for the environment that lent itself to creating a nice
composition. I began with only the main elements in
the scene: a door into the interior of the temple and
some stone blocks and trees strewn around the ruins.
To create the door, I added a cube in Object
mode (
shift
-A
4
Mesh
4
Cube) and scaled it (
S
) to
about the size I needed. Once you activate the Scale
operator, you can constrain scaling along one axis
(by pressing
X
,
Y
, or
Z
) to scale the object in only


Search WWH ::

Custom Search