Graphics Programs Reference
In-Depth Information
Depth of Field
Next came some depth of field. When adding depth
of field to the Spider Bot, I used physically correct,
rendered depth of field. However, for the Jungle
Scene, I used the compositor's Defocus node. This
method gives slightly less accurate results than ren-
dered depth of field, but it allows for more control
over which areas are blurred and which are not and
lets us change the focus
after
we finish rendering,
which gives us more flexibility.
The Defocus node requires two inputs: the
image to be blurred and a black-and-white mask that
determines how much to blur different parts of the
image. For the mask, you can use either the
z
-buffer
directly (check the
Use z-buffer input
checkbox), or
you can use any black-and-white image as a simple
mask by leaving it unchecked. If you choose to use
the
z
-buffer directly, Blender will use the camera's
depth-of-field settings found in the Object Data tab
of the Properties editor. Regions closer or farther
than the depth-of-field distance will be blurred. If
you turn this option off, Blender will use the value
of the input to determine the amount of blurring
so that white regions will be the most blurred and
black the least.
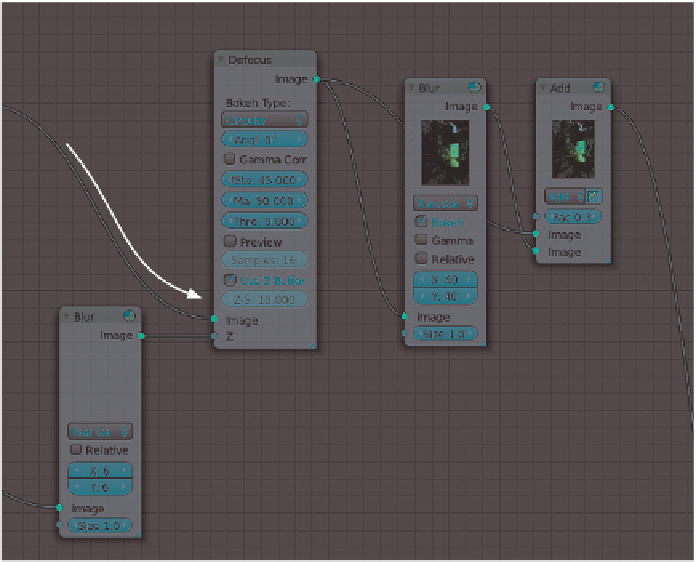
For the Jungle Temple scene, I opted to use
the
z
-buffer directly, but I added a Blur node (with
a radius of 6 pixels) between the
z
-buffer output
and the
z
-input of the Defocus node to blur these
values slightly. This method reduces the creation of
artifacts on foreground objects, where objects that
should be blurred appear to have sharp edges.
Adding Bloom and Vignetting
Next, I added some bloom. As with the other proj-
ects, I blurred the image and combined it back
over the image with an Add Mix node. I applied
some vignetting by taking the alpha channel of the
render, distorting it with the Lens Distortion node,
blurring it with the Blur node, and then overlaying
this on top of the image. The nodes for these stages
are shown in Figure 14-19.
Color Grading
To add color grading, I used two different nodes.
First, I put the image through a Hue Correct node,
which let me adjust the saturation (or hue or value)
of specific colors within the image. Because I wanted
to play up the oranges and greens before applying
some extra grading, I adjusted the curve of the Hue
Correct node by clicking the curve and dragging to
add a new point, raising the profile of the curve in
the orange and green areas, and lowering it slightly
in the blues. This increased the saturation of the
orange light from the temple entrance and the
green of the leaves, making
them more prominent. I ran
the result through a Color
Balance node, adding some
blues to the shadows with a
bluish lift color and some
yellow and orange to the mid-
tones and highlights with very
slightly orange gamma and
gain colors.
Finally, I added a
Filter node at the end of
the node tree, just before the
Composite output node. I set
this to Sharpen with a factor
of 0.05 to add some very slight
sharpening to the image.
This completes the
compositing for the Jungle
Temple scene. The com-
plete node setup is shown
in Figure 14-20.
Output
Image
Depth of field
Bloom
Z
-buffer
Figure 14-19: Adding depth of field and bloom to the composite


Search WWH ::

Custom Search