Graphics Programs Reference
In-Depth Information
Add ambient occlusion
to body
Add background color
Output
Body
Color grading
Sharpen
Bloom
Combine with fur
Viewer
node
Fur
Vignette
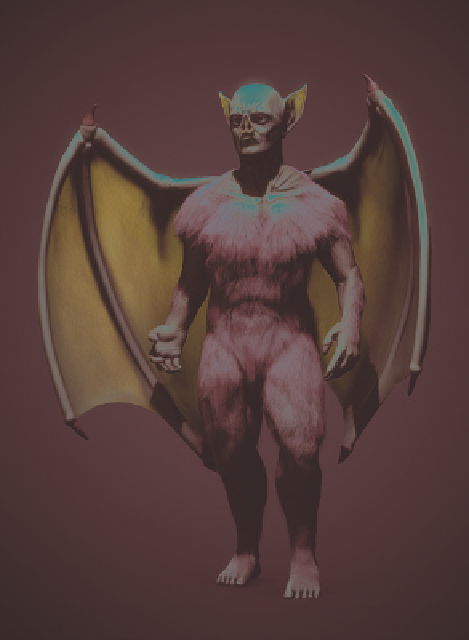
Figure 14-9: The compositing node tree for the Bat Creature
To quickly change which node the Viewer node
is connected to,
shift
-click any node in your setup.
This allows you to easily go through your node tree,
shift
-clicking each node in turn to see how it affects
the composite. (You could create multiple Viewer
nodes, but this method keeps your node tree clean.)
Organizing Node Trees with Frames and Node Groups
Node setups for compositing can become quite
complex as you add more and more nodes. If you
don't keep them organized, it can be difficult to
come back later to determine what's going on in
your node tree. To help with this, Blender lets you
organize nodes as Frame nodes and node groups.
Frame Nodes
Frames are large, rectangular nodes with no inputs
or outputs of their own; you place other nodes on
top of them, which then “stick” to the frame node,
allowing you to move collections of nodes together
as one. You can label Frame nodes to mark the parts
of your node setup (see Figure 14-11) by editing
the node's name in the Properties region (
N
). To
unstick a node from a frame, you can use the short-
cut
alt
-P, or you can use
alt
-F to unstick the node
and automatically grab it to move it around.
Figure 14-10: The composited output for the Bat Creature
Node Groups
Node groups are different from frames. To create
a node group, select one or more nodes and press
ctrl
-G to group them into a single node. The new
Group node should contain all of the selected nodes
with the inputs and outputs required by the group
To create a Viewer node, press
shift
-A
4
Output
4
Viewer
in the Node editor. Whatever is
connected as the input for this node will then show
up in the UV Image editor if you select
Viewer Node
from the drop-down menu or check
Backdrop
in
the background of the Node editor header.


Search WWH ::

Custom Search