Graphics Programs Reference
In-Depth Information
strands. In turn, this lets you UV map an image
to all your strands for texturing, but it works
only with strand rendering disabled.
Surface Diffuse
This setting causes the dif-
fuse shading of the surface to blend with the
strand shading over the specified distance.
Strand Coordinates
As mentioned above, we can texture strand materi-
als by using the UV map override. A simpler option,
however, is to use the strand coordinates for map-
ping when applying textures. While this only gives
a one-dimensional coordinate along the length of
the strand, this is usually enough for thin strands
any way.
For the Bat Creature's fur, I first set up a simple
material using the settings shown in Figure 12-22.
Notice that I enabled Z Transparency and set the
Alpha to about 0.7. For the Strand settings, I enabled
Blender Units and then set the Root and Tip sizes to
0.00125 and 0.0001, respectively. (These values are
small because the hairs need to be very thin, and
their widths are now given in Blender units.) I also
turned on Tangent Shading and set Width Fade
to 1.0.
Next, in the Texture settings, I used Blender's
procedural blend texture to add a fade to the hair's
alpha along its length, making it become transpar-
ent toward the tip. I added a new texture to the
material's first texture slot and set its type to Blend.
Then, I began adjusting the colors of the blend
texture by first enabling the Ramp option in the
Colors tab and then adjusting the colors that the
procedural texture used. I clicked Add to create a
couple more stops along the gradient and then set
the colors to fade from transparent black to opaque
white and back (see Figure 12-23). Finally, under
Mapping, I set the texture's coordinates to alpha,
and under Influence, I set the texture to multiply
with the material's alpha and its specular intensity.
I did something similar for the hair color. I cre-
ated a new blend texture in the next Texture slot,
but this time I set up a blend from black to white
(both alpha 1.0). Again, I mapped the texture to
the strand coordinates and set it to multiply by a
factor of 0.8 with the strand's diffuse color, which
made the base of the strands a little darker, thus
faking a bit of shadowing.
Next, I added a cloud texture, which I set to
modify the material's color—this time influencing
the diffuse color with a factor of 0.8, with the Blend
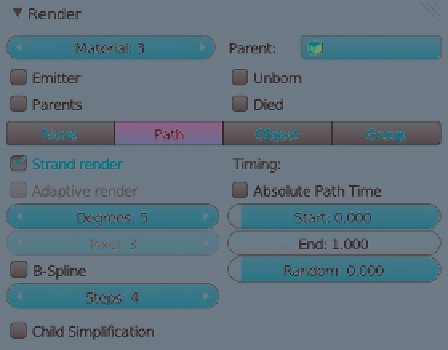
Figure 12-21: Enabling strand rendering from the
Particles tab of the Properties editor
Next, I specified the Strand options for the
material. In the Strand panel of the Materials tab,
you can specify how thick the strands will be and
their shape, among other options:
Size (Root/Tip/Minimum)
This determines the
thickness of the particles at the root and tip
of the hair. The Minimum setting specifies
the minimum width of a strand in pixels that
Blender will render.
Blender Units
By default, the thicknesses you
specify using the Size setting are specified in
pixels. This can be problematic if you have a lot
of particles at different distances away from the
camera, as they will be rendered with the same
width in pixels, making the faraway ones look
too thick. Turning on Blender Units lets you
specify particle width in Blender units instead.
Tangent Shading
This option uses the strand's
tangent direction rather than its normal for
shading, which generally gives better results.
Shape
This modifies the transition between the
width of the root and the tip of the strand. The
default value of 0 gives a linear transition. Nega-
tive values result in a spiky shape, while positive
values make the strand look more rounded at
the end.
Width Fade
This setting causes the strand to fade
across its width, but only when strand rendering
is enabled.
UV Map
This allows you to overwrite one of your
UV coordinate sets to provide a UV map for the
Search WWH ::

Custom Search