Graphics Programs Reference
In-Depth Information
slowly than Blender Internal. And because Cycles
is in active development, it lacks certain important
features, like subsurface scattering (see “Subsurface
Scattering” on page 194 for more information)
and the ability to render hair and fur.
I'll use both renderers in this topic. Which
renderer I choose for each project has a significant
impact on how I define my materials, because these
two render engines work in different ways and
require materials to be set up differently. For the
Bat Creature, I'll use Blender Internal to render
realistic skin with subsurface scattering, as well as
the fur. And for the Spider Bot, though either ren-
derer would do, I'll use Cycles to create some nice
glossy, reflective materials. For the Jungle Temple
project, I'll use Cycles to allow me to experiment
with lighting and get direct feedback, thanks to
Cycles' interactive render preview (discussed in
“The Cycles Render Preview” on page 200).
Before examining the differences in creating
materials for the two different render engines, let's
take a brief look at a few general principles that
will come up as we discuss materials. These prin-
ciples center mainly on the various ways a surface
can interact with light by reflecting, refracting, or
absorbing it.
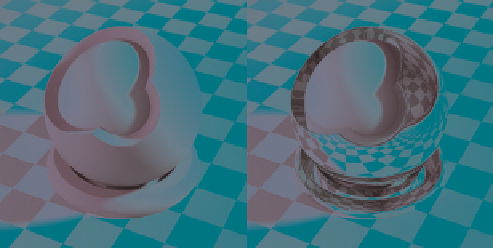
Figure 12-1: Diffuse (left) vs. specular (right) reflection
(Cycles renderer)
slower than rendering diffuse reflections because
there are simple algorithms to approximate the
effect of diffuse reflections. So rendering diffuse
reflections can be extremely fast, but rendering
mirror reflections requires processor-intensive ray
tracing. To get around this problem, we sometimes
consider only the most obvious things that a surface
can reflect, like bright lights. For example, if you
were to look at a shiny metal surface in bright light,
you might overlook mirror reflections of the sur-
rounding environment due to the very bright reflec-
tion of the light source itself. Specular reflections
work this way in Blender's Internal renderer: The
renderer creates only highlights from light sources
rather than making the surface reflect other objects
around it (see Figure 12-2). This shortcut often does
the job, and when more accurate reflections are
needed, you can turn them on as well (by enabling
ray-traced mirror reflections) at the cost of extra ren-
dering time.
Reflection
We see objects because our eyes detect the light that
bounces off them. The appearance of a surface is
thus determined by the precise way in which it inter-
acts with light, which is in turn determined by the
structure and composition of the material.
In the real world, matte surfaces, like rock and
rubber, have a rough structure on a microscopic
scale. Light bounces off them in all directions, and
as a result, the light you see reflected looks much
the same no matter which direction you look at the
surface from. This is called
diffuse
reflection.
In contrast, polished surfaces are relatively
smooth, even at microscopic scales. This means
that you'll see a perfect reflection when you look at
the surface, and as you move your viewpoint, what
is reflected will change. This is called
specular
, or
mirror
, reflection. The differences between diffuse
and specular reflection are shown in Figure 12-1.
In the world of CG, however, we often take
shortcuts to achieve the look of real materials. For
example, consider specular reflections: While it's
possible to render mirror reflections, doing so is
Figure 12-2: Blender Internal's approximated specular reflec-
tions (Blender Internal renderer). Often these are referred to
as
specular reflections
, while more realistic (mirror) specular
reflections are referred to as
glossy reflections
. Left: A material
with only specular reflections and a hardness of 15. Right: A
hardness of 100.


Search WWH ::

Custom Search