Graphics Programs Reference
In-Depth Information
Pinning Vertices
Unwrapping your mesh with the Unwrap operator
may not give you exactly the unwrap you want; for
example, one area might be scrunched up or have
a proportion that's not to scale. To fix this, you can
pin vertices in the UV Image editor so that they
won't move when you re-unwrap the mesh (short-
cut
E
in the UV editor or
U
in the 3D Viewport) by
selecting a vertex or vertices and pressing
P
to pin
them. (Pinned vertices will be highlighted in red.)
Now when you re-unwrap, Blender will keep the
pinned vertices in place and stretch the rest of the
unwrap to allow for this. To unpin vertices, select
them and press
alt
- P.
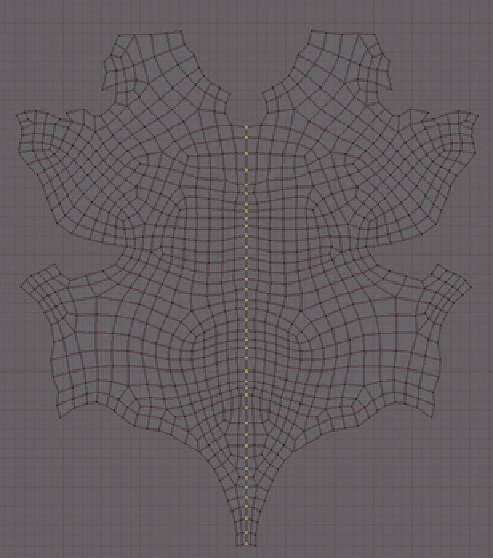
One important reason to use pinning is to estab-
lish a symmetrical unwrap. To do this, unwrap your
mesh and then select a string of vertices running
down the middle of the mesh and align them in the
UV Image editor so that they are in a straight line
(running in the appropriate direction). An easy way
to do this is to scale them to zero on the
x
- or
y
-axis
and then pin them (
P
). Now press
E
in the UV
editor to unwrap again. This gives you a more sym-
metrical unwrap, as shown in Figure 8-5.
Pinning can also be used to fix areas on large
meshes that unwrap on top of one another, as often
happens with long, tube-like meshes, where the
UV unwrap may coil around undesirably. To fix
this problem, pin one vertex from each end of the
mesh so that the vertices sit farther apart in UV
space, then unwrap the mesh again.
Finally, when unwrapping a mesh with a lot of
different pieces, it can help to pin entire UV islands
as you finish with them so that you can move on to
unwrapping other pieces without disturbing the ones
you're happy with. Blender will re-unwrap anything
you have visible in the UV Image editor by default
when you re-unwrap, so this is a good way to keep
finished parts of your unwrap safe.
Figure 8-5: To get a symmetrical unwrap on the torso of the
Bat Creature, I did a normal unwrap and then pinned the
vertices down the center of the chest in a vertical line and
unwrapped again. The result is a symmetrical UV island that
will be simpler to texture later.
When packing UV islands, be sure to keep the
scale of the islands similar. To average the scale of
any UV islands you have selected, use
ctrl
-A or
scale the islands manually. It's much easier, though,
to see whether islands are scaled correctly once you
have a UV test grid assigned (see “Testing Your UV
Coordinates” on page 114).
Assigning UV Textures
There are many ways to display textures on your
models. For one, you can use Blender GLSL mate-
rials to create advanced materials with Texture
options that respond to lighting and transpar-
ency. For simpler applications, though, such as
previewing how a single image will be mapped to
an unwrapped object, you can assign that image to
your model in the UV Image editor. To do so, take
the following steps:
Packing
When unwrapping characters and other unique
objects, it's often helpful to pack all of the UV
islands for your mesh into a single grid. To do
this automatically, you can use the Pack operator
(
ctrl
-P), but you can usually do a more efficient
job of packing UV islands yourself simply by mov-
ing, scaling, and rotating them like puzzle pieces.
To speed up the selection of whole islands, switch to
Island Selection mode in the UV Image editor using
the buttons in the header.
1.
Select the object and enter
Edit mode
.
2.
Select all of the faces and unwrap them if you
haven't done so already.
Search WWH ::

Custom Search