Graphics Programs Reference
In-Depth Information
project file can save a lot of frustration. This can easily be done by simply copying
the file among several users.
By now, you should've extracted the data for the iles you will use in the topic.
Now, you will tell Inventor where to find that data.
Creating a Project File
You can create a project file at any time, but you can make it active only when
all data is closed in Inventor.
1.
Make sure that all files are closed in Inventor, but Inventor is still
running.
2.
On the Get Started tab, click the Projects icon in the Launch panel.
This opens the Projects dialog box, where you can control the
active project file or edit existing ones.
3.
Click the New button at the bottom of the dialog box.
This launches the Inventor Project Wizard, which will walk you
through the process the next time you want to create a new project file.
4.
Click the New Single User Project option, and then click the Next
button at the bottom of the dialog box.
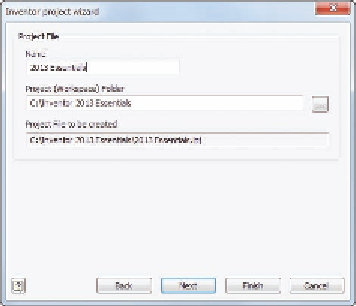
5.
Enter
2013 Essentials
in the Name field.
6.
Enter
C:\Inventor 2013 Essentials
in the Project (Workspace)
Folder field.
7.
Compare your settings to Figure 1.24, and when you're sure every-
thing matches, click Finish to create your new project file.
FIGURE 1.24
Defining the name and
location of the new project file
Search WWH ::

Custom Search