Graphics Programs Reference
In-Depth Information
faces, edges, and corners of the cube. Rotating the model using the ViewCube
works in a way similar to the Free Orbit tool.
The ViewCube is probably the most important tool in the Graphics window for
keeping track of your design. In the next exercise, you will get a chance to begin
using it.
Certification
Objective
1.
Keep using or reopen the
c01-01.ipt
file used in the previous exercise.
2.
Move your cursor to the ViewCube and over the face labeled Front
.
3.
When the face highlights, click it to rotate your model.
4.
Now, click the arrow that is pointing at the right side of the cube.
This rotates your view to the Right side.
5.
Move your cursor to the upper-right corner of the ViewCube, and
select it to see the Top, Right, and Back faces of the ViewCube.
6.
Now, click the ViewCube, hold your mouse button down, and move
your mouse around to orbit the view.
7.
After you've rotated your part, press the F6 key to return to the Home
view of the assembly.
Now, your screen should look as it did at the beginning of the exercise.
8.
Click the face labeled Right
.
9.
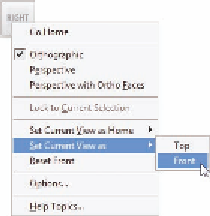
After the view updates, right-click the ViewCube, hover over Set Current
View As, and select Front from the menu that appears (see Figure 1.14).
10.
Now orbit the view to something you think offers a better view than
the current Home view.
11.
Right-click the ViewCube and use the Set Current View As Home with
the Fit To View option.
FIGURE 1.14
Faces on the
ViewCube can be redefined as
the Front or Top.


Search WWH ::

Custom Search