Graphics Programs Reference
In-Depth Information
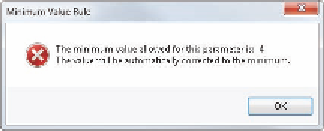
FIGURE 15.30
An error dialog box was built
directly from the wizard used to set size limits.
6.
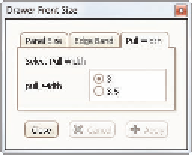
Change the width to 16 and the height to 7, click the Edge Band tab,
click the radio button for 3 mm Edge Band Thickness, and click Apply.
The fillet develops on the thicker edge band. Now, you need to add
to this form the option of using two different size pull spacing.
7.
Right-click the button on the Forms tab, and click Edit in the con-
text menu.
In the Form Editor dialog box, you can browse the parameters
available in the file and elements for making a dialog box. First you
should add a tab to place controls for the pull size.
8.
Click and drag the Tab group from the Toolbox group onto the
Drawer Front Size text in the top-right window.
9.
Change the name of the new Tab group to Pull Width.
10.
Drag a label under the Pull Width tab, and set it to read Select
Pull Width.
11.
Locate the pull_width parameter on the Parameters tab, and drag it
under the label.
12.
Click the new item, and the window below it will change to display
the properties.
13.
Click Edit Control Type, and change it from Combo Box to Radio
Group using the drop-down, as shown in Figure 15.31.
14.
If you don't see a preview on your screen, click the Preview button in
the dialog box, and click the new Pull Width tab.


Search WWH ::

Custom Search