Graphics Programs Reference
In-Depth Information
FIGURE 13.13
Editing the camera settings
These changes will rotate the view and zoom in a little closer. The
focus limits will put the area between 400 mm and 430 mm in sharp
focus, with parts of the model closer or farther from the camera
becoming increasingly out of focus.
6.
Click OK to make the changes to the camera.
7.
Use the Render Image tool on the Render panel to generate the image
in Figure 13.14.
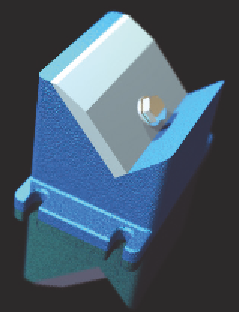
FIGURE 13.14
Setting focus
limits in the camera creates blur in
portions of the rendering.
Creating cameras is easier done than said, but I still prefer to get a point of view
in the Design window and initiate creating a new camera from there. Now, you can
leverage all the changes you've made to create an animation of the assembly in action.

Search WWH ::

Custom Search