Graphics Programs Reference
In-Depth Information
Adding the miter changes the length of both frame members. Any end treat-
ment applied to a frame member can be removed.
Changing an Edit and the Trim to Frame Tool
The Trim to Frame end treatment will take two members and set one to butt
against the other and then limit the length of the first member to the width of
the second.
The existing frame has a miter applied to two sections. You need to change it
to a Trim to Frame joint.
1.
Make certain that the 2013 Essentials project file is active, and then
open the
c11-05.iam
file from the
Assemblies\Chapter11
folder.
2.
Switch the Ribbon to the Design tab, and start the Trim to Frame tool
from the Frame panel.
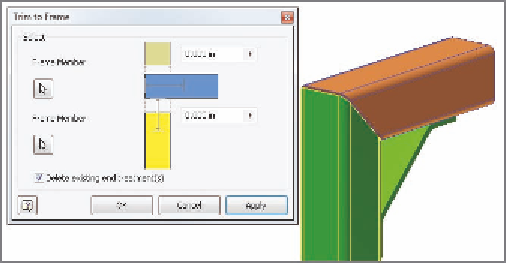
When the Trim to Frame dialog box opens, you will be prompted to
click two frame members. The first, represented in the dialog box in
blue, overlaps the second, represented in yellow.
3.
Click the orange section for the first option and the nearly vertical
section mitered to it as the second selection, as shown in Figure 11.7.
FIGURE 11.7
Modifying the miter to be an overlap
4.
Select the Delete Existing End Treatment(s) check box, and click OK
to update the model, as shown in Figure 11.8.
This removes the miter end treatment and then sets the orange member to
overlap the green.


Search WWH ::

Custom Search