Graphics Programs Reference
In-Depth Information
5.
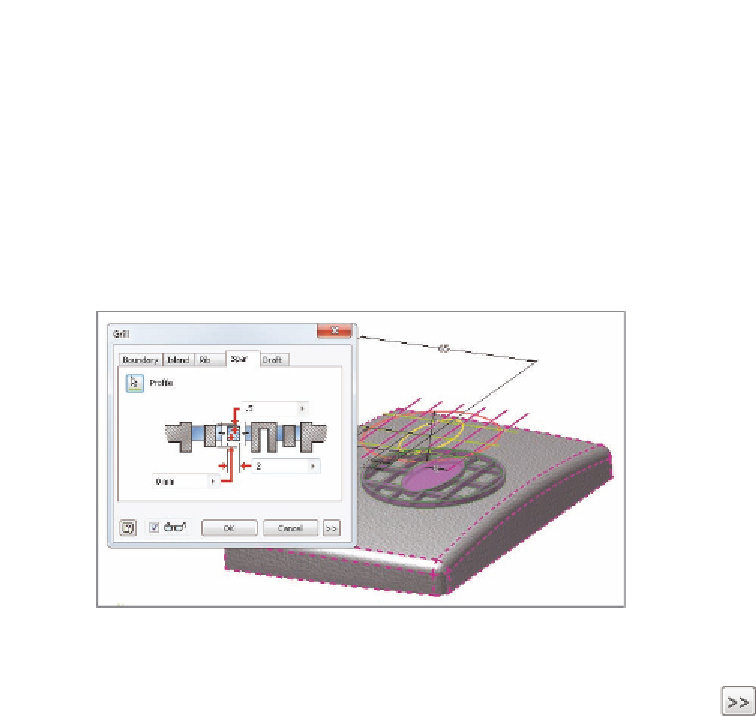
Click the Island tab, and for its profile, select the ellipse in the middle
of the sketch. Set the thickness of the island to 1.
6.
Select the Rib tab, and then click the six parallel lines in the sketch.
Do not change any of the dialog box options.
7.
Now, click the Spar tab, and pick the three lines that are perpendicular
to the last lines. Set Spar Thickness to 2 and Top Offset to .5.
8.
Compare your model to Figure 9.11.
FIGURE 9.11
A single grill feature can replace several other features.
9.
Expand the dialog box, and it will update to show what the open sec-
tional area of the grill is, for ventilation considerations.
10.
Click OK to generate the grill.
The grill is the most flexible feature for plastic parts. A wide selection of sub-
features allows you to pick and choose the elements you want to place.
Embossing or Engraving
The rules for creating an embossed or engraved feature, such as the product logo,
are the same as if you were going to extrude a solid feature. You can use a closed
sketch or text to define the feature's geometry.
1.
Verify that the 2013 Essentials project file is active, and then open
c09-09.ipt
from the
Parts\Chapter9
folder.
2.
Position the model so you can see the text in the sketch above the
grill feature.
3.
Start the Emboss tool from the Create panel of the 3D Model tab.

Search WWH ::

Custom Search