Graphics Programs Reference
In-Depth Information
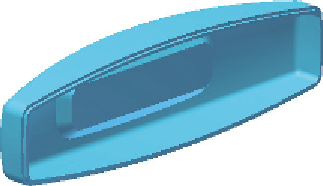
FIGURE 9.6
The lip added to the front body
TIP
You can also select the back part and place a lip using the Groove
option. If a lip feature is placed in a part, its properties will be picked up by
a groove in the same part.
Adding a Boss
Like the Lip tool, the Boss tool comes with opposite geometry sets. The head
and thread sides of the boss are collections of complex geometry that would nor-
mally take several features to create.
The bosses you add in this exercise will allow you to assemble the halves of
the back together using screws:
1.
Verify that the 2013 Essentials project file is active, and then open the
c09-05.ipt
file from the
Parts\Chapter9
folder.
2.
Start the Boss tool, which is in the Plastic Part panel on the 3D
Model tab.
3.
Make sure the Head option is active. It is the button in the upper-left
corner of the screen.
4.
Switch the Boss dialog box to the Head tab, and change the bottom
two size options from 6.6 to 6 and from 7.54 to 7.
5.
Expand the Draft Options section in the dialog box.
6.
Change the first two draft options from 2.5 to 2 degrees. Refer to
Figure 9.7 for the dialog box values.
You can also build
ribs around the
boss, and you can
adjust their height,
thickness, and angle.
7.
Click OK to generate the Head side bosses.
8.
Expand the Solid Bodies folder, right-click the Back-Top body, and
select Hide Others in the context menu.


Search WWH ::

Custom Search