Graphics Programs Reference
In-Depth Information
2.
Start the Rectangular Pattern tool from the Pattern panel of the 3D
Model tab.
3.
Select the Hole Boss and Hole 1 features from the browser.
4.
In the Rectangular Pattern dialog box, make the direction one selection
and pick the projected sketch that runs along the edge of the opening.
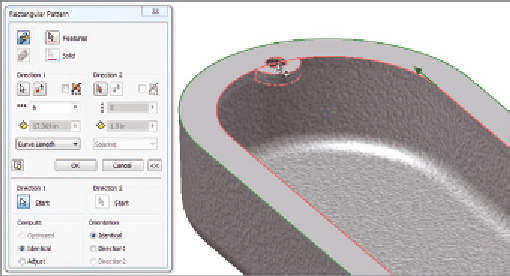
5.
Set the number of instances to 6, and use the drop-down to change
the spacing to Curve Length, as shown in Figure 7.15.
The initial preview shows instances of the features in space. It is
usually necessary to define the start point of the pattern to make
sure it follows the curve properly.
6.
Expand the dialog box, pick the selection icon for the Start of
Direction 1, and then select the point at the center of the hole.
7.
When the preview updates showing the instances following the sketch,
click OK to create the new features.
The new hole bosses and holes will be created, but there is one
more change to make to the model before you continue.
8.
Expand the Extrusion1 feature in the browser, and edit Sketch 1.
9.
Change the 2.5-inch dimension to 4 inches, and finish the sketch. To
see what the updated model will look like, take a look at Figure 7.16.
FIGURE 7.15
Be sure to select the sketch for your path and the
hole center for a start point
Search WWH ::

Custom Search