Graphics Programs Reference
In-Depth Information
Saving Time with the Assemble Tool
The Assemble tool works as a shell for many of the constraint tools. Based on the
geometry you select, it will preview a constraint and allow you to select a differ-
ent option or enter an offset or angle value using a mini-toolbar near the cursor.
1.
Verify that the 2013 Essentials project file is active, and then open
c04-09.iam
from the
Assemblies\Chapter4
folder.
2.
Start the Assemble tool from the Position panel of the Assemble tab.
3.
Click the blue face of the purple part and then the blue face of the
red part.
4.
Click the Apply icon in the mini-toolbar to add this Mate/Mate con-
straint, and move to the next constraint.
5.
Now select the yellow face on the purple part and the yellow face on
the red part. Apply the constraint.
6.
Now click the faces on the left of each part, and notice that the mini-
toolbar shows that it will add a Mate/Flush constraint.
7.
Click the OK button on the mini-toolbar to finish using the Assemble
tool on the purple part.
8.
Press the Enter key or the spacebar to start the Assemble tool again.
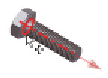
9.
Click the underside of the bolt where the shaft meets the head.
10.
Click the hole in the purple part, and click OK to place an Insert con-
straint between the bolt and the hole feature (Figure 4.15).


Search WWH ::

Custom Search