Graphics Reference
In-Depth Information
The Timeline panel is divided into four areas:
1.
Controls and options:
These controls are for playing the animation, including
fast-forwarding and rewinding it. You can also change the behavior of the
keyframes. The stopwatch icon activates the Auto-Keyframe Mode, which
automatically inserts a keyframe for all changes made to elements on the
Stage. The second icon activates the Auto-Transition Mode, which calculates
the necessary interpolation between two keyframes, creating the interme-
diate steps for a smooth transition. Turning that option off creates abrupt
changes between keyframes (see section 4.1.1). The pin icon activates the
Pin, a second playhead for easy positioning of keyframes for transitions (see
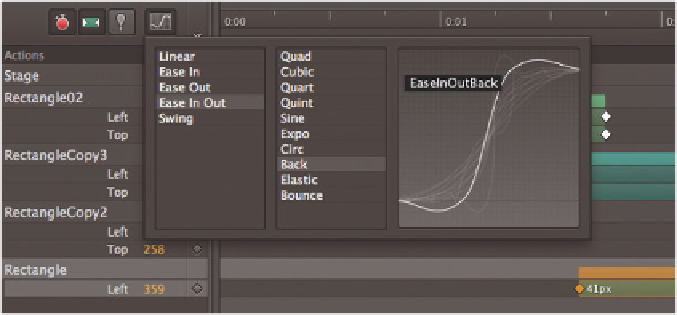
section 4.1.1). The grid icon with the diagonal line is used to apply an easing
function to a keyframe animation. It opens a dialog box with options and a
time/change graph to illustrate the course of the animation.
Figure 2.13
Easing functions are non-linear
animation sequences that make
animations appear more natural,
especially when motion is
involved
2.
Hierarchy of the animated levels:
The left section of the Timeline lists the
activated levels with their animation actions. Here each property is listed
(e.g., opacity, color, width, etc.) on a separate lane. Individual levels can be
expanded or collapsed. You can modify keyframes directly from this left
section or set new ones. You can also change the values displayed in yellow
with the mouse or click the diamond icon to set a new keyframe at the
playhead's current position. You can also use the curly braces on the left
side to define actions for individual levels. The lower bar of the Timeline con-
tains three other functions for filtering the tracks displayed (filter icon) and
controlling snapping on the Timeline (magnet symbol). To facilitate working
on the Timeline, you can also display a grid within the Timeline, which is
especially useful for fine-tuning keyframes.