Game Development Reference
In-Depth Information
So, now we have our
Floor
cube and
Wall
cube.
Next, we want to apply the material to our cubes. We will have only one
material for both the floor and wall to make it simple. Go to
Assets
|
Create
|
Material
, name it
M_Level
, adjust the color to
R: 150
,
G: 230
,
B: 225
,
A:
255
, and apply this material to the
Floor
and
Wall
objects by dragging the
material
Floor
and
Wall
objects in the
Hierarchy
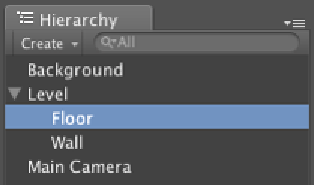
view. Then we drag-and-
drop
Floor
and
Wall
inside our
Level
object, as shown in the following
screenshot:
Now, we will click on the
floor
object in the hierarchy, and press
Command + D
for Mac users or
Ctrl + D
for Windows users to copy it six
imes, and click on the
wall
object in the hierarchy and copy it twice. So
now we have seven
floor
objects and three
wall
objects.
Next we create our level by seing up the posiion and scale of our
floor
and
wall
objects. Let's set them up as follows:
F
1
st
Floor object: Posiion: x: -4, y: -9, z: 0 Scale: x: 125, y: 15, z: 1
F
2
nd
Floor object: Posiion: x: -6, y: 5, z: 0 Scale: x: 32, y: 1, z: 1
F
3
rd
Floor object: Posiion: x: -25, y: 12, z: 0 Scale: x: 19.5, y: 1, z: 1
F
4
th
Floor object: Posiion: x: 14, y: 12, z: 0 Scale: x: 20, y: 1, z: 1
F
5
th
Floor object: Posiion: x: -7, y: 9, z: 0 Scale: x: 9, y: 1, z: 1
F
6
th
Floor object: Posiion: x: -31, y: 1, z: 0 Scale: x: 6, y: 1, z: 1
F
7
th
Floor object: Posiion: x: 21, y: 2, z: 0 Scale: x: 10, y: 1, z: 1
F
1
st
Wall object: Posiion: x: -49, y: 17, z: 0 Scale: x: 36, y: 40, z: 1
F
2
nd
Wall object: Posiion: x: 42, y: 17, z: 0 Scale: x: 38, y: 39, z: 1
F
3
rd
Wall object: Posiion: x: -7, y: 23, z: 0 Scale: x: 1, y: 36, z: 1
Finally, we will save the scene by pressing
Command + s
in Mac or
Control + s
in Windows. Since it is our first save, we will be asked to
name this scene, so let's name it
SimplePlatform
.