Java Reference
In-Depth Information
The following table illustrates how tags will be laid out inside an
<h:panelGrid>
tag:
First Tag
Second Tag
Third Tag
Fourth Tag
Fifth Tag
Sixth Tag
Seventh Tag
Eighth Tag
Ninth Tag
Each row in our
<h:panelGrid>
consists of an
<h:outputLabel>
tag, an input field,
and an
<h:message>
tag.
The
columnClasses
attribute of
<h:panelGrid>
allows us to assign CSS styles
to each column inside the panel grid, its
value
attribute must consist of a comma
separated list of CSS styles (defined in a CSS stylesheet). The first style will be
applied to the first column, the second style will be applied to the second column, the
third style will be applied to the third column, so on and so forth. Had our panel grid
had more than three columns, then the fourth column would have been styled using
the first style in the
columnClasses
attribute, the fifth column would have been
styled using the second style in the
columnClasses
attribute, so on and so forth.
If we wish to style rows in an
<h:panelGrid>
, we can do so with its
rowClasses
attribute, which works the same way that the
columnClasses
works for columns.
Notice the
<h:outputStylesheet>
tag inside
<h:head>
near the top of the page, this
is a new tag that was introduced in JSF 2.0. One new feature that JSF 2.0 brings to the
table is standard resource directories. Resources such as CSS stylesheets, JavaScript
files, images, and so on, can be placed under a top level directory named
resources
,
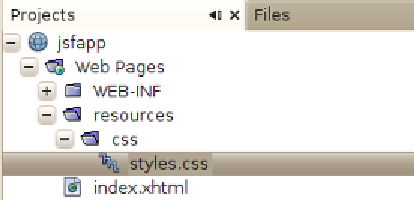
and JSF tags will have access to those resources automatically. In our NetBeans
project, we need to place the
resources
directory under the
Web Pages
folder.
We then need to create a subdirectory to hold our CSS stylesheet (by convention,
this directory should be named
css
), then we place our CSS stylesheet(s) on this
subdirectory.