Graphics Programs Reference
In-Depth Information
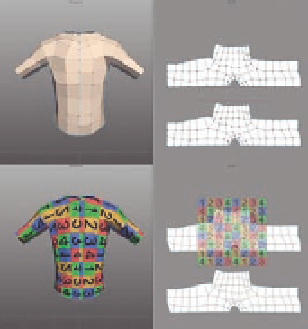
FIG. 3.32
You can split the mirrored sides of a
UV map to ease the map manipulation work.
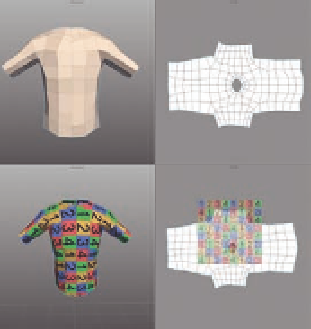
FIG. 3.31
LSCM unwrapping of the shirt.
The result should look like Figure 3.31, which puts us well on our way to a
clean UV map. There are other unwrapping tools in the
UVs/Materials
>
Recreate UVs
drop-down menu, but for the most part, they are for spot work
or setup on a complex model. The main tool is LSCM.
Unwrap UVs using LSCM;
UVs/Materials
Unwrap
UVs using LSCM
U;
The next step involves mirroring. This might not be necessary all the time,
and would likely be unnecessary for a simple object like this shirt. However,
it's always an option if working with a mirrored object, and it's important to
understand how it works.
●
Select the object, and then select
Mirror UVs
from the
UVs/Materials
drop-down menu.
The shirt should then appear folded on top of itself because we have told
Silo these two sides will look the same. However, unlike with the 3D view,
symmetry isn't enabled, and working with two pieces on top of each other
can be dii cult. So, before we move on, we need to:
●
Add a new seam down the front and back middle of the shirt (Figure 3.32a).
●
Double click on one of the shell faces (or click on a face and press
Shift
1
or select
Selection
>
Expand Selection
from the top menu) to select all of
the connected faces.
●
Slide one of the UV sides out of the way (Figure 3.32).
We'll essentially discard one of the sides, focus on getting the other just right,
and re-mirror later.
Now it's time for resizing and moving the UV map to get it centered in the
UV square. All the tools and manipulators available in the standard modeling
kit are available to move the UV map around, but there are also some nice
custom tools in the
UVs/Materials
drop-down menu.
●
Try either
Arrange UVs in Bounds
or
Scale UVs to Bounds
after selecting
the whole mesh and you should get something that looks like Figure 3.33.