Graphics Programs Reference
In-Depth Information
less chance for system slowdowns (which can happen when working with
high polygon counts), and less chance for artifacts and holes that can present
themselves when dramatic sculpting changes are made to large numbers of
polygons.
Just as it's helpful to work from lower subdivisions up, it's often helpful to
have an order for working with the brushes. One good option is to start with
Sharp Push
to carve out some of the main elements, and then use
Smooth
t o
soften the overall ef ect. Next, use
Pinch
to help dei ne and sharpen creases or
folds, and then
Smudge
to move details around, add sagging, and otherwise
dramatize the organic ef ects.
Let's trying putting that workl ow into practice by adding some organic detail
to a grid shape.
●
Start by creating a 10 10 grid from the
Create
>
Grid
>
opt
menu. It
should look like Figure 3.23a .
●
Now subdivide twice and try the brushes in the order discussed to create
some organic shapes. In Figure 3.23, we have made two wavy lines, a ring
and circle, but feel free to try other shapes if you like.
●
Trace out the shapes with
Sharp Push
(Figure 3.23b), and then iron out
any rough spots with
Smooth
(Figure 3.23c). Be careful not to take out too
much of what you've done.
●
Next use
Pinch
(Figure 3.23d) to sharpen the borders, and
Smudge
(3.23e)
to add additional organic l air.
●
Once you're happy with the basic feel at this level of subdivision you can
start working at higher levels. Subdivide and add detail following the
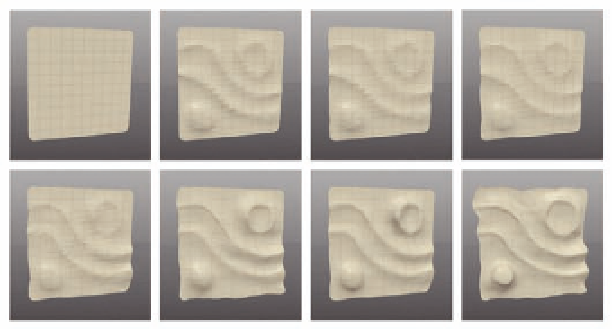
same steps. Continue working to see results like those in Figure 3.23f-h.
More on this process is covered in Chapter 9 as we go over clothing creation
for our model.
FIG. 3.23
Following the Push, Smooth, Pinch, Smudge workl ow is a good way to add organic detail.