Graphics Reference
In-Depth Information
2.
On the
New
dialog, click the
Assembly
template.
3.
Type-in
Main_assembly
in the
Name
box and click
Folder
button.
4.
Browse to NX 10/C3/ Oldham_Coupling folder and then click
OK
button
twice; the
Add Component
dialog appears.
Adding Disc to the Assembly
1.
Click the
Open
button.
2.
Double-click on
Disc.prt
.
3.
Under the
Placement
section, select
Positioning
>
Absolute Origin
.
4.
Set
Reference Set
to
Model
.
5.
Click
OK
to place the Disc at the origin.
Fixing the Disc to the Origin
1.
Click
Assemblies > Component > Assembly Constraints
on the ribbon; the
Assembly Constraints
dialog appears.
2.
On the
Assembly Constraints
dialog, select
Type > Fix
.
3.
Select the Disc and click
OK
.
Placing the Sub-assembly
1.
Click the
Add
button on the
Component
group.
2.
Click the
Open
button.
3.
Double-click on
Flange_subassembly.prt
.
4.
On the
Add Component
dialog, select
Positioning
>
By Constraints
.
5.
Click
OK
; the
Assembly Constraints
dialog appears.
6.
Set
Type
to
Touch Align
7.
Set
Orientation
to
Touch
.
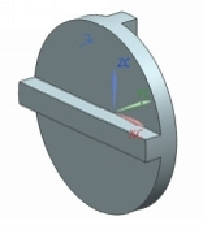
8.
Click on the face of the Flange as shown in figure.