Graphics Programs Reference
In-Depth Information
things creates the glowing surreal quality we are not able to view with our
eyes. The images of the bridge and the hurdeler were exposed with infrared
i lm and printed in the silver process. In the following lesson, we will recreate
this ef ect digitally, which, I have to concede, is far easier than it was the
traditional way!
In order to simulate the infrared ef ect, there are two dif erent methods I have
found to work most ef ectively. The key to both methods is in accentuating
the green foilage within an image.
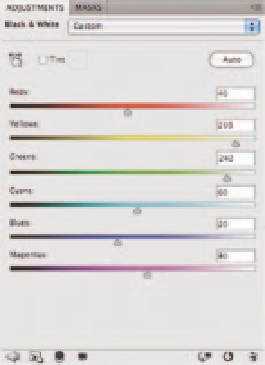
Step 1: Convert to Monochrome and accentuate Green
Create a black and white conversion adjustment layer using either the
Channel Mixer or the Black and White stand-alone feature in Photoshop. Try
both and see which one works best for your image.
With the Black and White stand-alone feature, you need to increase the values
of the Green and Yellow sliders so that the foliage in the image becomes very
light, paying close attention not to blow out detail within the image.
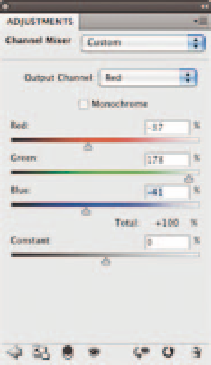
With the Channel Mixer, increase the value of the Green channel to close to
200%, and reduce it slowly paying close attention not to blow out detail in
the image. Reduce the Blue and Red channels so that the sum of all three
channels is roughly 100%. Totals can really be what looks best, give or take a
few! Start with Red 50 and Blue 50 and fudge the three until the image
looks right to you.
Step 2: Filter Dif use Glow
The easy next step is to target the background layer (the image must be in
8-bit), or create a new merged layer on top, and go the Filter menu and
choose Distort Dif use Glow.
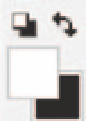
Note:
Make sure your
background colors are
set to the default of
black and white before
you initiate the i lter.
Choose a grain factor of about 5 to begin with, a relatively small
glow about a value of 2, and a clear amount of 10.

Search WWH ::

Custom Search