Graphics Programs Reference
In-Depth Information
Setting Black and White Points
If true black and crisp whites are what you are after, then setting black and
white points within an image is a good place to begin your digital darkroom
practice. This process will give you added tonal control, as well as eliminate
unwanted color cast within an image. We will outline a few dif erent ways to
set black and white points.
Before we begin, however, we need to reset the eyedroppers tools as
Photoshop installs with values for the color correction eyedroppers set
to default numbers that represent a pure black and a pure white. For
photographic purposes, we need the settings to represent values for both a
white and black with detail.
Changing the Dropper Default settings
For photographic purposes it is necessary to i rst reset the black and white
eyedroppers default target values
To maintain black and white with detail, i rst create a Levels or Curves
adjustment layer. As both Levels and Curves utilize the same Eyedropper tool
functions, changing the settings in either one corrects the tools universally.
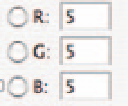
Double-click on the black and white eyedroppers within the dialog box to
bring up the color picker. Edit the RGB values to read as follows:
Black Point values:
RGB values: 5, 5, 5
There are a number of value settings on the market today. Those that we have
outlined above are a typical stock agency requirement. Although they vary
among agencies, these numbers were recommended by the Corbis stock
agency, who is currently one of the leading agencies setting standards for
commercial digital imaging. Look under Setting White Point in the Adobe Help
menu for additional number settings as recommended by Adobe. Save these
as your defaults or talk to your agency or printer/service provider for their
recommendations.


Search WWH ::

Custom Search