Graphics Programs Reference
In-Depth Information
Develop Module User Presets
The presets available are organized into two folders: Lightroom Presets and
User Presets. The Lightroom Presets ship with the software, while User Presets
are uniquely created or installed by you. The ability to create and share
User Presets is by far one of the coolest reasons to bring Lightroom into the
digital darkroom workl ow. Many talented photographers and Lightroom
gurus have already made hundreds of presets available on the internet.
A Google search of “Lightroom presets” will bring a wealth of options for free
downloadable develop presets. Visit www.santafedigitaldarkroom.com for
some downloadable black and white presets coming soon.
Installing Customized Lightroom Develop Presets
1.
Open Adobe Photoshop Lightroom.
2.
Select an image for creative adjustment.
3.
Click on the Develop module at the top right.
4.
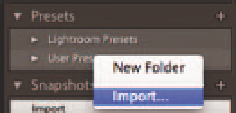
In the Presets panel on the left, CTRL-click on a Mac, or right-click (PC) on
the User Presets.
5.
Choose “Import” from the pop-up menu.
6.
Browse to the .LR template i le(s) downloaded and select one or more.
7.
Click “Import”.
Creating Your Own Lightroom Develop Presets
Creating your own custom develop presets can really help save time and
streamline workl ow ei ciency in the digital darkroom workl ow. Any
repetitive adjustments in Lightroom can be recorded to create your own
custom develop presets. These are especially useful for batch processing
images with exposure adjustments, white balance settings, black and white
conversions and other development corrections with a single click.
1.
Process an image in the Develop Module as desired.
2.
In the Presets panel on the left, click the plus symbol (+).
3.
Type in a descriptive name for the new preset.
4.
Choose which adjustments to include in the new preset.
5.
Click “Create”. You now have a preset template that can be applied to any
image with a single click.


Search WWH ::

Custom Search