Graphics Programs Reference
In-Depth Information
channel will not af ect your channels. Copy and paste each channel into the
appropriate new layers you have just created.
You can make excellent conversions by simply lowering the opacity of
the dif erent layers at this point. But who is stopping there? I said this one
goes to 11!
Step 8:
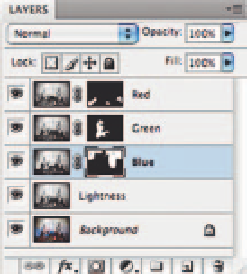
Add a “Hide All” layer mask to each of the Red, Green and Blue
channels. Do this by holding the Option key as you click the “Add Layer Mask”
icon in the Layers palette, or simply use the Layer Menu Add Layer Mask
Hide All.
Step 9:
Use a paintbrush, set to the default colors of black and white at
various opacities, and hide or reveal the dif erent aspects in which you noted.
I revealed the doorway on the Blue channel, the curtains, feet and skirt
on the green channel layer and the empty bed detail on the red channel
layer.
Try this technique with images shot in low light. The blue channel is great for
bringing out lost shadow detail. But be careful, as it also holds the most noise!
If you love this method, you may want to create a customized action in
Photoshop that sets up the layers for you to make the process a bit
faster. Visit the Santa Fe Digital Darkroom website for downloadable
actions coming soon: www.santafedigitaldarkroom.com.


Search WWH ::

Custom Search