Graphics Programs Reference
In-Depth Information
typically contains most of the detail in the image. The Blue channel typically
contains the luminosity, skin tones and contrast but also frequently the most
noise. For this image, the Green channel was selected.
**Be sure you
click back on the RGB letters
at the top of the Channels
palette to return the image to color before moving to the next step.
Channel Mixer: The Method
Step 1:
Choose Channel Mixer
from the Adjustment panel, or from the Layers
palette, by clicking on the adjustment layer icon at the bottom of the Layers
palette.
Step 2:
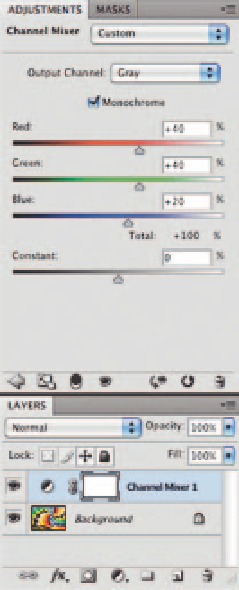
Check Monochrome
Check the box next to the word “Monochrome” in the lower left-hand side of
the Channel Mixer box. The image will immediately turn to grayscale.
The initial mixture predetermined by default, as of Photoshop CS3, opens with
Red 40%, Green 40% and Blue 20%. These better default values are actually
another cool new feature as of CS3, as CS2 used to just map to 100% Red.
Photoshop lessens the amount assigned to the Blue channel because the Blue
channel typically holds more noise than the other two channels of Red and
Green.
Note:
Be careful of the Blue
channel as it typically
holds more noise than
the other two channels
of Red or Green. Unless
the goal is to create a
grainy-looking image
or some exaggerated
ef ect, it is best to steer
clear of using too much
Blue channel in the
mixture.
The advanced user may wish to monitor the Histogram palette in this process.
(See Chapter 2, “Highest Quality Capture”, page 29, for more information.)
Step 3:
Make Custom Changes
Adjust the Red, Green and Blue sliders to add and subtract amounts or
percentages of each channel to produce an image to your liking. The choices
made are purely aesthetic. The user has complete control of how each
channel will be represented in the i nal image outcome.
For an even more pronounced ef ect, some colors can even have negative
percentages.
It is advised that the percentage totals should not exceed 100%, when
all three channels are added, in order to maintain the density or overall
brightness of the image, although creative interpretation should always take
precedence over numbers. Experimenting with dif erent color settings will
enable you to i nd the combinations that your prefer. Be mindful though, if
the number totals do equate to over 100% there is a risk of losing highlight
information. Notice how cool Photoshop is to provide us with a Calculation
Total feature at the bottom of the channel sliders! So fabulous not to have to
do all that math on the l y!
Other cool new Channel Mixer features in Photoshop include the ability to
save, load and share settings and presets.
Note:
Curiously, the image will
not return to Color if the
Monochrome button
is unchecked. To reset,
hold down the Option
key and the Cancel
button will turn to reset.
Step 4:
Click OK when i nished.


Search WWH ::

Custom Search