Graphics Programs Reference
In-Depth Information
giving you three types of styles to choose from: facade styles, material styles,
and 3D model styles. The details of these choices are as follows:
facade styles
Facade styles are the most complex of the three choices. As
you will learn later in the topic, facade styles employ facade themes to enable
complex alternating patterns and even 3D geometry to project from the building
faces.
Material styles
Using a material style will simply apply a single color or an
assortment of tiled images to the building faces.
3d Model styles
Using a 3D model style will actually insert a 3D model. As
you'll learn soon, to create a building you'll pick points to define the building
perimeter. When you use a 3D Model style, the perimeter is ignored since the
shape of the building is defined by the model you've inserted.
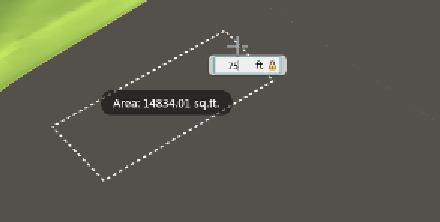
Once you have launched the command, you simply pick points to define the
perimeter of the building. One option that I haven't discussed that has been
available with the roads and coverage features is the ability to enter a distance
when selecting points. This is particularly helpful when drawing building shapes
because you often have an idea what the rough building dimensions are. You
can enter a value in the tooltip and press Enter to lock it in. A lock symbol at the
right end of the tooltip indicates that the value is locked. Now you can pick the
next point, and no matter where you pick, the distance between the new point
and your last point will be the value you've entered (see Figure 3.35).
fIgure 3.35
Using tooltips to draw buildings with
specific dimensions
When you reach the final point of the building, double-click to end the com-
mand. The building will be created in your model with a default height. You will
learn how to change the height in the next section.


Search WWH ::

Custom Search