HTML and CSS Reference
In-Depth Information
set :user, "ci.fishrod.co.uk" # The SSH user for your website
set :deploy_group, "ci.fishrod.co.uk"
set :use_sudo, false # Tells capistrano not to run commands as root
:user
will set the user used to log into your remote server.
:deploy_group
will
set which group Capistrano will set permissions for any uploaded files to.
:use_sudo
will stop Capistrano from uploading and changing files as a root user.
With Capistrano fully configured, it's now time to set up your production server
for deployments.
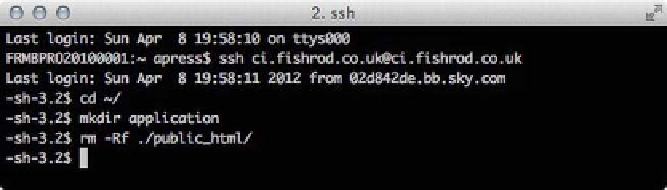
In order to do this, log into your remote server again, and then go to the folder
just above your web server's document root folder. For example, your root
might be
/var/www/html
, so you should go to your
/var/www
directory. If you're
on a shared host, you should go to
~/
, which will be your home directory.
Create a new directory called
application
in that directory, and remove your
document root folder, as shown in Figure 9-24. Your document root folder may
be called
htdocs
,
html
, or
public_html
; it will be referred to as
public_html
throughout this chapter.
Figure 9-24.
Creating the application directory and deleting the document root directory
You before finalizing the Capistrano configuration, you need to set up the
Capistrano folders on the remote server. To do this, return to Aptana Studio and
open the terminal view. Run the following command:
cap production deploy:setup
This will log in to your remote server and create the appropriate files and folders
for you. You should see something similar to the output in Figure 9-25.