Graphics Programs Reference
In-Depth Information
you will have a good output profile for the printer you intend to use for
this tutorial. That way, you can visually see the effect of various working
spaces on your final output. For output evaluation, be sure to have a
good viewing box or at the very least, an environment where you can
view the prints side by side to see the effects of the RGB working space
on the Working Space Test file.
1.
Open the
WorkingSpaceTestFile.tif
found on the supplied
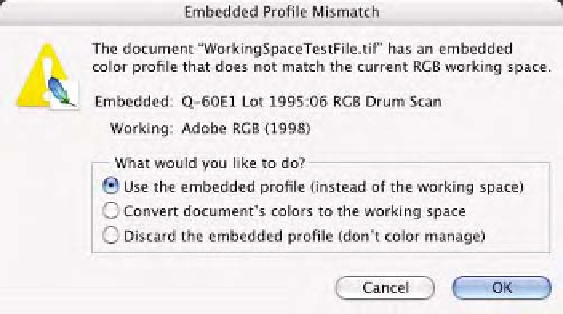
CD. This image was scanned using a high-end drum scanner
and the document is embedded with the correct input profile. If
your Color Settings are such that you get an
Embedded
Profile Mismatch
, pick the radio button
Use the embedded
profile (instead of the working space)
to preserve the color
space of the document seen in Fig. 9-4-1 since we want to
work with the full gamut of the capture device.
2.
Once the document is open, it will be necessary to duplicate it
so that you can convert the document into several RGB
working spaces. Choose
Image-Duplicate
, name this
document
sRGB
, and click
OK
.
3.
After the new duplicated document is created, we will convert
from the capture color space into sRGB.
4.
Choose
Image-Mode-Convert to Profile
in Photoshop CS or
Edit-Convert to Profile
in CS2 as seen in Fig. 9-4-2.
From the
Profile
pop-up menu, select
sRGB
.
From the
Engine
pop-up menu, select
Adobe ACE
.
From the
Intent
pop-up menu, select
Relative Colorimetric
.
Have
Use Black Point Compensation
and
Use Dither
check
boxes on.
Be sure the
Preview
check box is on.
Click
OK
.
Fig. 9-4-1
If the
Profile
Mismatch
appears, select
the radio button
Use the
embedded profile
(instead of the working
space)
.