Graphics Reference
In-Depth Information
With the clip “Brian overexposed” called up into your application (
Fig-
1.23
b
). Bring down the master setup level until the trace of the blue chan-
nel of the waveform display starts to flatten out at the bottom, then bring
it back just a hair. If you don't have an RGB or YRGB display, then bring
down the setup (or black or shadow) level until the overall waveform
level starts to flatten out at the bottom, then bring it up just a touch.
In Color, there are two ways in the Primary Room that you can make
this adjustment. One would be to drag inside of the black to white gra-
dated bar in the Shadows group (
Figure 1.24
a
). I pulled the shadows
down to around -0.301 from 0 (
Figure 1.24
b
).
Or, on the right side of the screen, you could pull the Master Lift down
to about the same level. (This is done by dragging in the number window,
holding down the center button or mouse scroll wheel.)
One of my favorite color correction analogies is that making adjust-
ments—especially to blacks and highlights—is like focusing a camera.
Point a camera at a subject and look in the viewfinder. The image may,
by chance, appear to be in focus. But you don't
really
know if it's in focus
(a)
(b)
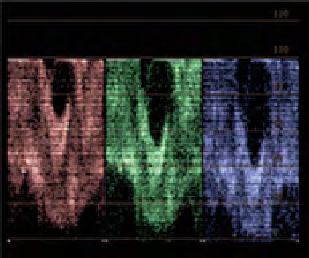
Fig. 1.24
(a) Shadow
color wheel adjustment.
(b) Master lift adjustment.
(c) What the image should
look like after the correc-
tion to shadows or lift. (d)
The internal RGB Parade
waveform display that
corresponds to the first cor-
rection to shadows or lift.
(c)
(d)


Search WWH ::

Custom Search