Graphics Reference
In-Depth Information
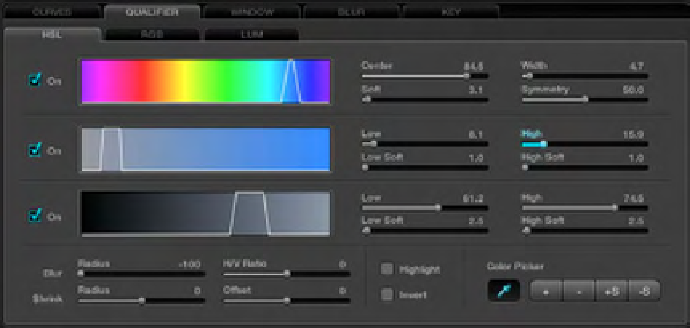
Fig. 5.24
We want to make the canopy of the ultralight pop better from the sur-
rounding field and trees. To do that, we'll make the grass greener and the
canopy bluer. The first part of this process is to qualify—that is, select—
the canopy. The easiest way to do this is with the eyedropper button at
the bottom right of the Qualifier tab of Resolve's Color screen.
First, select the HSL tab of the Qualifier tab and make sure that the
“On” checkboxes to the left of the hue, saturation, and luminance bars
are selected (
Figure 5.24
)
. Click on the eyedropper icon then click on or
drag over the canopy in the small viewer window in the upper left corner
of the Color screen. By the way, the Viewer screen also has an eyedropper
icon, and you can use that if you want a larger “canvas” on which to use
the eyedropper. Obviously, the image on the Viewer screen is bigger than
the smaller image on the Color screen.
When you've selected some pixels from the canopy, notice the changes
to the hue, saturation, and luminance bars. They indicate—with a white
“bell graph”—the values of the pixels that have been selected by the
eyedropper.
To see what this qualification looks like on the image itself, click on
the Highlight check box at the bottom of the HSL tab, near the eyedrop-
per icon. This changes the viewer window so that the selected pixels are
shown in their normal color state and the unselected pixels are grayed
out (
Figure 5.25
)
.
This feature makes it easier to see how well we are qualifying the
image as we continue to manipulate the controls. We want to select as
much of the canopy and as little of the rest of the image as possible.
To continue to finesse this qualification, we will use the + and—and + S
and -S buttons to the right of the eyedropper button. These are the color
Search WWH ::

Custom Search