Graphics Reference
In-Depth Information
We could further qualify just the lion using a garbage matte created in
the vignette section, but for now, see if adjusting the saturation or lumi-
nance controls will clean up this qualification any further. After a bit of
experimenting, I found that the hue control by itself worked to get the
best key (note the check mark in
Figure 5.13
).
Before we try to improve the qualification any more, let's see if we can
accomplish what we want to do to the lion with the qualification we already
have. This step is part of the time management of color correction. You
could try to really dial in a perfect matte for the lion, but it is possible that
the fairly rough qualification that we have now will suffice, so why waste
any more time on it? Later on, you may discover that in order to really take
the secondary correction where you want it to go, you need a better quali-
fication so that your adjustment does not pollute other areas of the image.
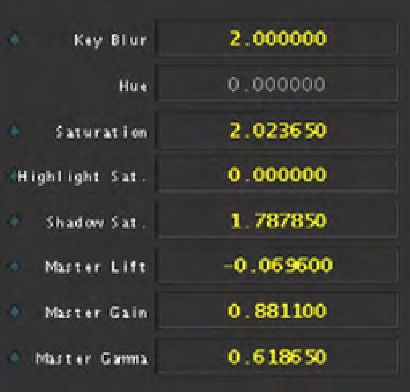
Our goal with this correction was to make the lion pop from the back-
ground and be more prominent. I started by taking the midtone hue off-
set wheel all the way down to cyan on the outside edge of the wheel,
but then I decided that I didn't want to have the lion's hue swing to a
new direction—I just wanted to increase the saturation and contrast of
the color that already existed. So I reset my hue offset wheel and just
increased the saturation and lowered the gamma, lift and even the gain a
bit. Here are the numbers (
Figure 5.15
)
.
Fig. 5.15
Here's the before and after (
Figure 5.16
). This isn't a final correction—
just a secondary on the lion. I also included a diagonal split image to see
the difference.
Search WWH ::

Custom Search