Graphics Programs Reference
In-Depth Information
subject must be in color and must have depth. Professional photographers and artists
recommend selecting a subject that has three main elements, one near the camera,
one far away, and the third in between. A simple example is a nearby gray rock, a
green/brown tree in the background, and a white fence
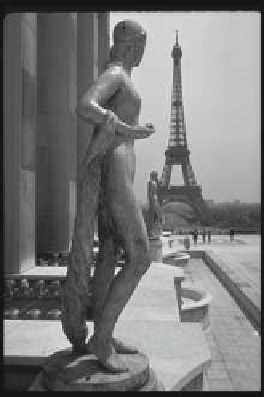
running between them. A similar example is a nearby
statue in the Palais de Chaillot, the Eiffel Tower in the
background, and the Pont d'Iena in between. Once such
an image is converted to stereoscopic, the viewer can eas-
ily see the relative positions of the three elements. In addi-
tion, the subject should have other background elements,
because a picture with only three items looks empty and
disappointing. Experience shows that the best results are
achieved if the distance of the nearest picture element
from the camera is 30 times the baseline. For the normal
baseline of 6.5 cm, this translates to a distance of 195 cm
or about 6.4 ft. However, many stereo enthusiasts have
discovered that the baseline does not have to be 6.5 cm as
long as a ratio of 30 is obtained. Thus, if the nearest ob-
ject is 300 cm from the camera, then a baseline of 10 cm
will produce a realistic-looking stereoscopic image.
The third rule is to maintain precise vertical alignment of the two pictures. Every
picture element must appear at the same height in the two pictures. Thus, the camera
should not be tilted, raised, or lowered between the two exposures. It should only be
shifted horizontally.
Rule 4 is to avoid having many red and blue (or red and green) objects in the
picture. Section 3.13 shows that a stereoscopic image generated as a color anaglyph
looks bad if it uses these colors extensively.
Also, make sure the camera is held vertically and is not tilted up or down, as this
may cause unwanted converging lines and extra vanishing points, features that tend
to confuse the viewer. Only static images can be photographed (images with moving
elements, such as clouds, flags, or vehicles, can be photographed with a pair of cameras;
see below). Finally, remember which image is for the left eye and which is for the right
eye. Switching these two results in a nonworking stereo image.
We now turn to techniques for taking a pair of stereo pictures with a camera.
Perhaps the simplest (and cheapest) technique is to use a small, 6 ft (2 m) ladder.
Place the camera on several steps of the ladder until you find the ideal height for your
subject. Take a picture, move the camera horizontally about 6.5 cm, and make the
second exposure. A ruler or a straight piece of wood makes it easier to slide the camera
without tilting or rotating it.
If you own a tripod, you can get better results. The simplest way to use a tripod
is to take one picture, lift the tripod, move it to the left or right, and take the second
picture. Before you start, draw a straight line on the ground, perpendicular to the line
of sight of the camera, and position the tripod such that two of its legs are on the line.
Much more accurate results can be yours if you build a simple jig like the one
illustrated in Figure 3.45.
Search WWH ::

Custom Search