Graphics Programs Reference
In-Depth Information
this mode, you have already made some Color Setting decisions that might not be accurate. Remember,
as long as the image is in RGB, you can later change your settings.
1
Choose File > Open, navigate to the advps05lessons folder, and open the file named
advps0502.psd
.
An image of a garden appears.
2
Choose Edit > Color Settings in Photoshop CC. The Color Settings dialog box appears.
3
As a default, North America General Purpose 2 is selected. This is a generic setting that basically in-
dicates that Photoshop has no idea where the final output of this image will be viewed. Depending
upon your image's final destination (print, web, or mobile), the results could vary widely.
4
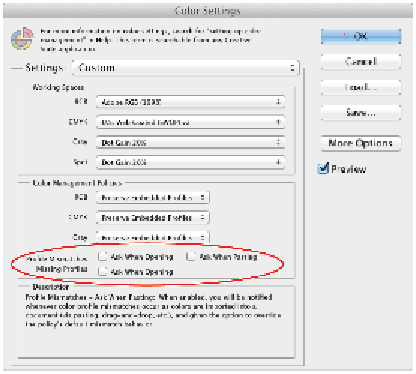
For this example, choose North America Prepress 2. Note that all the warning check boxes become
active at the bottom of the dialog box. Uncheck them for this lesson, and then click OK to exit the Co-
lor Settings dialog box. Don't worry that your Settings are now indicating Custom; this occurred be-
cause you unchecked the warnings.
Uncheck the warnings after you change the Settings.
5
To stay in the RGB mode and see the effect of your settings change, press Ctrl+Y (Windows) or Com-
mand+Y (Mac OS). This is the toggle keyboard shortcut for CMYK Preview. Using this preview, you
can stay in RGB and see your image in the CMYK gamut.
You can change your preview by selecting View > Proof Setup. As a default, it is set to Work-
ing CMYK.
6
Choose File > Save As. When the Save As dialog box appears, name this file
advps0502_work
, and
make sure it is in the Photoshop (PSD) format. Check to make sure that you are saving the file into the
advps05lesson folder and click Save.